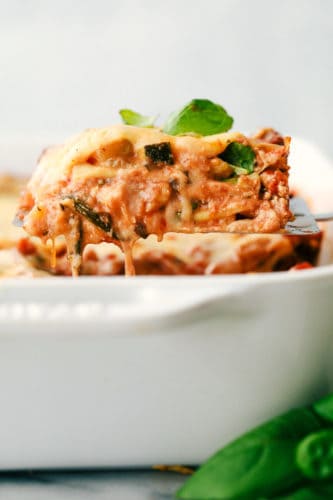
Full of flavor and hearty veggies, this truly is the Best Vegetarian Lasagna! Smothered in tender pasta, exquisite sauce and melty cheese this Lasagna is going to hit the spot! And I promise you won’t miss the meat!
This is such an amazing dish, I love to pair it with my Best Homemade Easy Cheesy Garlic Bread and some Greek Salad (with the Best Dressing). For me Italian dinners need a bit of chocolate afterwards so whip up this Easy Chocolate Pudding Pie for the perfect finish to a meal restaurant worthy!

Vegetarian Lasagna Recipe
Lasagna is such a comfort food and what a better way to eat your veggies than as a comfort food. This is the perfect way to sneak in those veggies without anyone even knowing. The meatiness of the mushrooms especially makes it seem like there is meat in there. It’ll be our little secret. As your family and friends lick their plates clean and ask for more you can smile knowing they are getting in their veggies! You are going to love this recipe. It does take a bit of time to prep but once it comes together it’s ready in no time. Plan for it on a busy weekend or meatless Monday. It’ll become a family favorite in no time.
With the veggies, sauce and cheese you’ll end up with the most wonderfully robust flavored dish. I couldn’t believe how much flavor there was! There was zing, meatiness, savory, and creaminess. All combined together for this explosion of lusciousness in my mouth. This makes a large 9×13 which will give you leftovers for another meal, or lunches for the week. Either way you will look forward to eating this again and again. You won’t be able to get enough of tender veggies, perfectly cooked noodles, creamy cheese and savory sauce! It’s just so heavenly! Make it tonight!
Ingredients for Italian Vegetarian Lasagna
Yes, there are a few ingredients in this, but trust me it’s worth it! The combination of veggies, seasonings and cheese make for an absolutely marvelous dish you’ll want to make again and again. Everything can be found at your local grocery store, so no special trips to a specialty store. Plan this into your weekend meals, leftovers are even better!
- Oil: Just enough for sautéing the veggies.
- Zucchini: small chopped
- Mushrooms: Chopped
- Carrots: Chopped
- Onion: Chopped
- Spinach: Fresh works best in this recipe
- Crushed Tomatoes: 1 large 28 oz cans or two 14 oz cans
- Tomato Sauce: 2 of the smaller cans or 1 large 12 oz.
- Tomato Paste: This will intensify the tomato flavor without adding more liquid.
- Italian Seasoning:The best combination of spices for lasagna.
- Sugar: This helps balance the acidity in the tomatoes.
- Salt and Pepper: Just to taste
- Fresh Basil: Chop it finely.
- Lasagna Noodles: You’ll pre-cook the noodles but don’t over cook them.
- Ricotta Cheese: This is a staple in lasagna fillings.
- Parmesan Cheese: Adds a nice salty tang.
- Egg: You’ll mix this with the ricotta.
- Mozzarella Cheese Shredded: Use freshly shredded cheese so it doesn’t have the caking agents on it. This prevents the cheese from melting nicely.
How to Make Vegetarian Lasagna Step by Step
This takes a little bit of prep work, but again, it’s totally worth it. It comes together nicely and the flavor is so rich and divine, you won’t miss the meat. Use a non stick skillet so that you don’t have to add more liquid. You don’t want it watery. Drain your veggies before you add the tomatoes if you think it’s too watery.
- Sauté: In a large skillet over medium high heat add the olive oil. Add in the zucchini, mushrooms, carrots and onion and sauté until tender. Add in the spinach and continue to cook until it starts to wilt.
- Simmer: Add crushed tomatoes, tomato sauce, tomato paste, Italian seasoning, sugar and basil. Let simmer on low heat.
- Cook: In a large pot bring water to a boil. Add the lasagna noodles and cook 8-10 min or till al dente. Drain and rinse in cold water.
- Stir: In a medium bowl combine the ricotta cheese, parmesan and egg. Mix till incorporated.
- Preheat: Preheat oven to 375 degrees and spray a 9×13 pan with non stick spray and set aside.
- Layer: To make the lasagna start by spreading 1 cup of the vegetable sauce on the bottom. Arrange the noodles in a single layer over the sauce. Spread 1/2 cup of the ricotta cheese, on top of the noodles followed by shredded mozzarella cheese. Repeat the layers and top with cheese.
- Bake: Cover with aluminum foil and bake for 20 min. Remove the foil and bake and additional 20-25 min or until it is heated throughout and cheese is bubbly. Let it cool for 10 min before serving.

Tips for Making Easy Vegetarian Lasagna
This isn’t a hard recipe but a few tips will make it perfectly perfect every time!
- Noodles: This recipe calls for baking your own noodles first. Keep them al dente, and error on the side of under cooking them. This way the noodles can absorb any liquid that comes from the sauce.
- Veggies: I used veggies we like in our lasagna but you can substitute for veggies you like. Eggplant, squash, broccoli are all good choices.
- Drain: I like to drain any of the extra liquid that comes from sautéing the veggies. You don’t any extra liquid in your sauce or it will become soggy.
- Simmer: Simmer without the lid on so that extra liquid can evaporate.
- Ricotta: Adding the egg to the ricotta helps it bind to the noodles so it doesn’t ooze from the lasagna. You can substitute small curd cottage cheese for the ricotta for hit of protein and creaminess.

Why Healthy Vegetarian Lasagna?
We are always being told that we don’t get enough vegetables in our diet. It can be hard, I get it. That’s why I love recipes like this that don’t sacrifice on flavor and give me more veggies too. Recipes like Cajun Shrimp and Sausage Vegetable Skillet, Easy Vegetable Stir Fry or Healthy and Easy Vegetable Detox Soup. Perfect for after the holidays when we need a reset in our diets. It’s no secret vegetables are high in vitamins, minerals and fiber. All of which can help protect our bodies from diseases, cancer, and maintain overall health. With such a wide variety of textures and flavors it’s easy to create exciting dishes and ways to serve them. Try to incorporate more veggies in your diet for overall good health, as you eat more, you’ll feel better inside and out. Start by having a plate of cut up veggies with some Ranch Dip in the fridge to snack on. Make more recipes with veggies in them like this One Pan Crispy Parmesan Garlic Chicken and Vegetables.Every little bit helps. And this Lasagna is another amazing way to get those veggies.

Freezing and Storing Vegetable Lasagna
- Freeze: This recipe freezes so well. Freeze before cooking or after. Double the recipe and make one to eat and one to freeze for another day. If you freeze it after baking allow to cool completely before freezing. Cover tightly, or transfer individual portions in freezer safe containers. Freeze for up to 3 months. If you freeze before baking, again cover tightly or transfer in individual portions to freezer safe containers and freeze up to 3-4 months.
- Storing: Lasagna is almost better the next day and this is no exception. Store leftovers tightly wrapped in the fridge for up to 5 days.
- Reheat: To cook unbaked lasagna from frozen, bake at 375 degrees and add on an extra 20-30 minutes. To reheat from frozen place in the oven at 375, it’ll take about 30-40 min to heat through. For leftovers they can be reheated in the microwave or oven.

More Lasagna Loving Recipes
Lasagna is a comfort food. It’s cheesy, it’s got noodles and it has intense, rich, amazing flavors. There are so many different ways to make lasagna too. You could make a different recipe every night of the week and not eat the exact same thing twice. Try them all and decide on your favorite!

Vegetarian Lasagna
Ingredients
- 1 tablespoon olive oil
- 1 small zucchini chopped
- 1 cup mushrooms chopped
- 2 large carrots chopped
- 1 small onion chopped
- 2 cups spinach
- 1 28 ounce can crushed tomatoes
- 2 6.5 ounce can tomato sauce
- 1 6 ounce can tomato paste
- 2 Tablespoons Italian Seasoning
- 1/4 cup sugar
- salt and pepper to taste
- 1 tablespoon fresh basil chopped
- 12 lasagna noodles
- 16 ounce ricotta cheese
- 1/2 cup parmesan finely grated
- 1 large egg
- 2 cups mozzarella cheese shredded
Instructions
-
In a large skillet over medium high heat add the olive oil. Add in the zucchini, mushrooms, carrots and onion and sauté until tender. Add in the spinach and continue to cook until it starts to wilt.
-
Add crushed tomatoes, tomato sauce, tomato paste, Italian seasoning, sugar, and basil. Let simmer on low heat.
-
In a large pot, bring the water to a boil. Add the lasagna noodles and cook for 8-10 minutes. Drain and rinse in cold water.
-
In medium sized bowl add the ricotta cheese, parmesan, and egg. Mix until incorporated.
-
Preheat oven to 375 degrees and spray a 9x13 inch pan with non stick spray and set aside.
-
To make the lasagna start by spreading 1 cup of the vegetable sauce on the bottom. Arrange the noodles in a single layer over the sauce. Spread 1/2 cup of the ricotta cheese, on top of the noodles followed by shredded mozzarella cheese. Repeat the layers and top with cheese.
-
Cover with aluminum foil and bake for 20 minutes. Remove the foil and bake and additional 20-25 minutes or until it is heated throughout and cheese is bubbly. Let it cool for 10 minutes before serving.
Nutrition
source https://therecipecritic.com/vegetarian-lasagna/