Chef Joe Flamm grew up in a big Italian family, where there was always sauce bubbling on the stove. The rule of the house was: if you walked in the kitchen, you stirred the sauce. Since then Joe has worked in Michelin-starred restaurants, won Season 15 of Top Chef, and now opened his first restaurant in Chicago, Rose Mary. It’s named after his two grandmothers and inspired by his Italian heritage. Like Dan, Joe has strong opinions about pasta, but he takes sauce just as seriously. Joe tells Dan why rigatoni carbonara will always win out over spaghetti carbonara, when it’s better to skip fresh pasta and go with the dried stuff, and the one thing you never want to do when saucing any kind of pasta.
This episode is sponsored by Bertolli. Their new Bertolli d’Italia sauces are made in Italy, crafted with vine-ripened tomatoes under the Italian sun, finely-aged Italian cheeses, fresh cream, and Mediterranean olive oil. Find sauces, recipes and meal inspiration at bertolli.com/ditalia. //
Get 500+ more great Sporkful episodes from our catalog and lots of other Stitcher goodness when you sign up for Stitcher Premium:www.StitcherPremium.com/Sporkful(promo code: SPORKFUL).
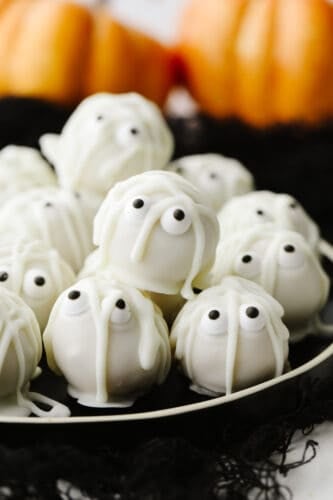
Mummy cookie bites are a ghoulish and festive treat for the Halloween season! Amazingly delicious, the white chocolate mixed with the oreo truffle is the perfect combination!
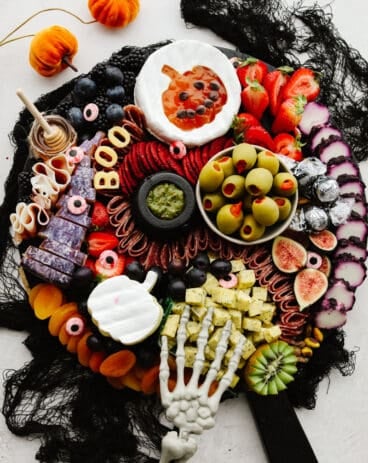
These mummy cookie bites are such a fun treat to make! They are yummy and your kids will go crazy over them! If you want to try out a few more festive holiday treats, try this Halloween Charcuterie Board, these Mummy Hot Dogs, or these Mummy Mini Pizzas. They are all fun and delicious!
Mummy Cookie Balls
These mummy cookie bites are amazing! Crushed up Oreos, mixed with cream cheese creating a soft, truffle-like inside. Then, you coat that with melted white chocolate and chill them in the fridge. They are so easy and absolutely delicious! My kids love that they can be decorated and changed depending on the holiday. Because of that, we have these ALL the time!
These are such a fun treat to make with your kiddos! They are simple and easy and the kids love rolling them up into balls and decorating them. I love that they are small, individual serving sizes so you can enjoy them as much or as little as you want! This makes them perfect for a dessert at a party. In fact, make some Pumpkin Cream Cheese Truffles and Thin Mint Truffles to go with them! They can feed a lot of people and the rich, Oreo taste is just too irresistible for anyone to stop after just one. Go ahead and give them a try because I know that you are going to LOVE them!
What Ingredients Do I Need?
This is the amazing part… you only need 3 ingredients to make these mummy cookie bites! It doesn’t get much simpler than that. See the recipe card below for a list of exact measurements.
Cream cheese: I made sure that this was softened at room temperature before I mixed it. This helps make it smooth with no clumps!
Golden oreo cookies: I love the vanilla flavor of these! You can also try using chocolate oreos for a different taste!
Bakers white chocolate: This white chocolate gives this recipe the perfect outside coating!
Decorations (optional): I used candy eyes to make them mummy-like for the Halloween season! But depending on when you make these, you could switch all of that up!
How to Make Mummy Cookie Bites
These mummy cookie bites are so quick and easy to make! They take about 15 minutes to make. In fact, the hardest part is waiting for them to chill for a few hours in your fridge! But that is what makes these a great “make-ahead” dessert!
Mix and make into balls: Mix cream cheese and cookie crumbs until blended then shape into 1 inch balls.
Freeze balls, melt chocolate and dip: Freeze for 10 minutes. Meanwhile, melt the Baker’s chocolate as directed. DIP balls in melted chocolate and place in single layer on waxed paper-covered rimmed baking sheet. (Re-freeze balls if they become too soft to dip.)
Chill: Refrigerate 1 hour or until firm.
Melt chocolate for topping: MELT remaining chocolate as directed on package; spoon into small resealable plastic bag. Then, press out excess air from bag and seal the bag. Cut 1/8-inch piece from one bottom corner of bag.
Drizzle and decorate: Squeeze bag to pipe chocolate onto each ball for the mummy’s eyes. Immediately add desired decorations for the eyeballs. Then, pipe the remaining chocolate onto balls to resemble gauze strips.
Chill (again): Refrigerate until firm.
Varitations to Try
These mummy cookie bites that are made like this are the perfect Halloween treat! But, if you change up only a couple of things then you can make them for ANY occasion or holiday! Here are a few ideas to try!
Oreos: If you want, you can make these with regular, chocolate oreos instead! This changes up the taste completely and makes them rich and delicious in a whole new way!
Change the colors: You can use candy melts in different colors! Try using red or green for a Christmas party. Or, red, white, and blue for the 4th of July! If you want to use food coloring then you can but make sure that it is OIL based and not water based. Water based food coloring will make your chocolate seize!
Chocolate: Instead of using white chocolate for the outside shell, go ahead and use regular chocolate! Change up the taste a little!
Toppings and decorations: You can top these with just about anything! My favorite is to use different color sprinkles. On top of the white chocolate, it looks so cute! You can also top them with cinnamon sugar ot shredded coconut. Just make sure that you pu all toppings on just after dipping them. Then, they will stick and stay!
How to Store Leftovers
If you have leftovers of these amazing mummy cookie bites then just be sure to store them correctly so that they save well for later! Store them in an airtight container and put them in your refrigerator. These can last 3-4 days in your fridge!
More Halloween Recipes to Try
I love Halloween! Not just because of the trick or treating, pumpkin carving or fun decorations… But mostly because of the FOOD! Here are a few more fun recipes that I’ve made to celebrate your halloween season! They are delicious and impressive. Your guests will want to make sure that they are invited to all of your future parties because they won’t be able to get enough of this delicious food!
Mummy cookie bites are a ghoulish and festive treat for the Halloween season! Amazingly delicious, the white chocolate mixed with the oreo truffle is the perfect combination!
CourseDessert, Snack
CuisineAmerican
Keywordmummy cookie bites, mummy cookies
Prep Time15minutes
Refrigerate Until Firm2hours
Total Time2hours15minutes
Servings24Bites
Calories180kcal
AuthorAlyssa Rivers
Ingredients
1package (8 ounces)Cream Cheese(softened)
36finely crushed golden oreo cookies
14ouncesBakers white chocolate
Decorations:candy eyes
Instructions
Mix cream cheese and cookie crumbs until blended. Shape into 1 inch balls.
Freeze for 10 minutes. Meanwhile, melt the Baker's chocolate as directed. DIP balls in melted chocolate; place in a single layer on waxed paper-covered rimmed baking sheet. (Re-freeze balls if they become too soft to dip.)
Refrigerate 1 hour or until firm.
MELT remaining chocolate as directed on package; spoon into small resealable plastic bag. Press out excess air from bag; seal bag. Cut 1/8-inch piece from one bottom corner of bag.
Squeeze bag to pipe chocolate onto each ball for the mummy's eyes; immediately add desired decorations for the eyeballs. Pipe remaining chocolate onto balls to resemble gauze strips.
Refrigerate until firm.
Notes
Updated on September 30, 2021Originally Posted on October 17, 2012
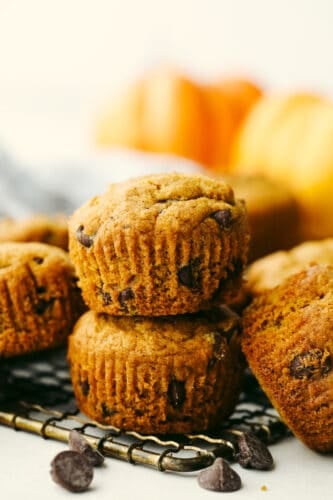
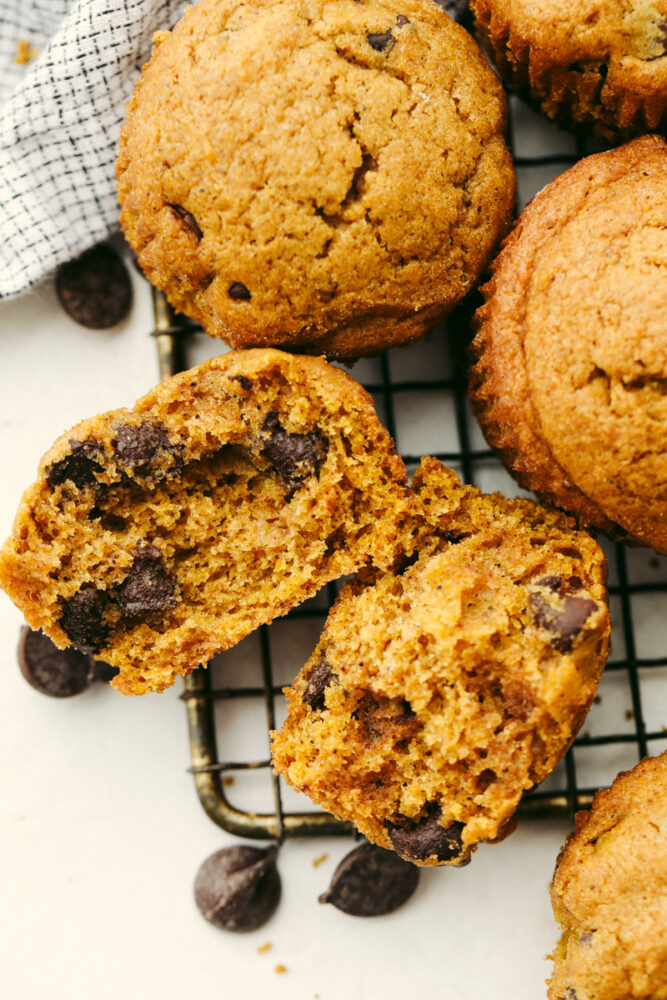
Pumpkin chocolate chip muffins are moist, chocolatey, and topped off with a sprinkling of sugar! The spices and pumpkin puree flavors make these perfect for cooler weather!
Fall is here and I’m all about the pumpkin and chocolate! If you love pumpkin as much as I do try then go ahead and try some of my favorite recipes like these Cookies, Muffins, or these amazing Pancakes.
Pumpkin Chocolate Chip Muffins
Pumpkin is so delicious and I want to load it into every possible recipe once fall rolls around because there’s just something so festive about it! I love decorating with them and even more, baking with them! In fact, these pumpkin chocolate chip muffins are one of my favorite tried and true, fall recipes! They are so easy to make and are a twist on your classic chocolate chip muffins. It’s an easy and delicious addition and a recipe that you will be wanting to make each fall! Or if you’re like me then it will creep into your baking ALL year long!
When you add pumpkin puree to a recipe, it adds such an amazing texture! It is what makes these muffins super soft and moist! So not only does the flavor taste delicious but it actually helps out in the baking process as well! Pumpkin puree can go fast at the stores. Because people are using it so often, it’s a good idea to stock up on a few cans at the beginning of the season. That way, you will have some on hand for whenever the craving hits! You will need it to make these yummy pumpkin cream cheese truffles and also this incredible pumpkin cake!
Ingredients for Pumpkin Chocolate Chip Muffins
These muffins are so delicious. They are just the right mixture of sweet with the taste of pumpkin flavor. Everyone loves these and I’m sure that you will too! See the recipe card below for exact measurements.
Butter: Use unsalted butter at room temperature that you can cut easily into small pieces!
Flour: I used all purpose flour in this recipe!
Granulated sugar: Sugar adds in that sweetness.
Brown sugar: Brown sugar is on of my favorite sweeteners!
Baking soda and baking powder: These help the muffins to rise and be fluffy!
Salt: The sale will help enhance the flavors of all of the other ingredients!
Ground cinnamon: Cinnamon is a classic fall flavor!
Large eggs: Use eggs that are at room temperature to mix better into the batter.
Vanilla extract: This adds flavor to the sweetness!
Milk: Milk will help to bring in that rich and creamy taste.
Semisweet chocolate chips: I used semisweet chocolate chips but you can use whatever ones that you have on hand.
Coarse sugar: This is to garnish on top after the muffins have baked!
Let’s Make Some Muffins!
These pumpkin chocolate chip muffins are simple and come together quickly! I love making this recipe with my kids!
Preheat oven and prepare muffin tin: Preheat oven to 350 degrees and line a 12 count muffin tin with paper liners and then set it aside.
Warm your butter: Place your butter pieces in a large, microwave-safe bowl and microwave until melted and then set it aside. Let the butter cool down to room temperature. Butter that’s too hot could cook your eggs or melt your sugar! Don’t let the butter ruin your muffins!
Whisk together dry ingredients: In a large bowl combine flour, sugars, baking powder, baking soda, salt, pumpkin spice, and cinnamon and whisk them until well-combined. Then, set them aside.
Stir together: Return to your bowl with the melted butter and make sure it has cooled down. Add eggs and vanilla, stir well.
Mix together: Add pumpkin puree and milk and stir until completely combined.
Mix the dry and wet ingredients together: Gradually stir your dry ingredients into your wet until completely combined. I like to go slow so that I don’t over mix the batter.
Add chocolate chips: Gently fold in 1 cup of the chocolate chips.
Pour batter into muffin tins: Evenly divide muffin batter into prepared muffin tins (filling each ¾ full). Sprinkle tops of muffins with remaining ⅓ cup of chocolate chips and then sprinkle tops generously with sugar.
Bake in the oven: Bake on 350 for 20-22 minutes (toothpick inserted in center should come out mostly clean with only few crumbs).
Cool completely: Allow muffins to cool and then serve and enjoy!
Variations
There are a few different ways to make these pumpkin chocolate chip muffins perfect for you! Here’s a couple of ideas for you to try and enjoy!
Make mini muffins: You can make these into mini muffins and take them on the go! Just follow the instructions for this recipe to make them. Then, line a 24 mini cupcake muffin tin with liners (or spray it). Cook them for 12-15 minutes at 350 degrees. Let them cool and then you can gobble them right up!
Turbinado sugar: This sugar is a mouthful to say but its absolutely delicious! Instead of using regular sugar to sprinkle on the top, try this instead! This sugar becomes nice and crisp on top of your muffins. It looks beautiful and tastes so sweet!
Add-ins: If you want to try something new, add in some white chocolate chips or even some walnuts to the batter! I have also used some shredded coconut to give it a unique taste! Adding different things to the batter will change up the taste so that you can make them different every time!
How to Store Muffins
These pumpkin chocolate chip muffins are soft, springy, and I love them best when they’re served warm out of the oven. I love that melty chocolate! If you can’t eat them right away, follow these instructions so that you can store them and enjoy them later!
Making the batter ahead of time: Make the batter and place it in a sealed, airtight container. Put it in the fridge for up to one day before use.
Room temperature: Once your muffins have cooled, place them in an airtight container or ziplock bag. Store them on your counter for 2 to 3 days.
Refrigerator: Stored in an airtight container, these muffins can last in the fridge for 4 to 5 days.
Freezer: I place your muffins on a baking sheet (try not to have them touch) and place them in the freezer. after a couple of hours, they should be frozen. This helps them not to stick to one another! Take them out and store them in a ziplock bag or an airtight container. They will last for about a month like this in the freezer.
Reheating: Take them out of the refrigerator or freezer. Let the muffins sit at room temperature to thaw. Use the microwave for a quick warm up or place them in the oven for a few minutes until they are warmed through.
*NOTE: I like to add a paper towel on top of the muffin tops to help lock in moisture and keep the muffins from sticking to each other and the bag when I am storing them. You can also stack your muffins on top of one another using the paper towel in between the layers.
More Pumpkin Recipes to Love
If you loved these muffins and are ready to start your pumpkin baking season off, you’ve come to the right place! Here are a few more tried and true pumpkin recipes that I love! Some are sweet and some are savory, depending on what you are looking for. They are so delicious, they are all worth trying! Enjoy!
Pumpkin chocolate chip muffins are moist, chocolatey and topped off with a sprinkling of sugar! The spices and pumpkin puree flavors make these perfect for cooler weather!
CourseAppetizer, Breakfast, Dessert, Main Course, Side Dish, Snack
Place your butter pieces in a large, microwave-safe bowl and microwave until melted. Set aside (you want the butter to cool down to room temperature so it's not too hot before you add the eggs — butter that is too hot could cook your eggs or melt your sugar and ruin your muffins)
In a large bowl combine flour, sugars, baking powder, baking soda, salt, pumpkin spice, and cinnamon. Whisk until well-combined. Set aside.
Return to your bowl with the melted butter and ensure that it is not hot to the touch. Add eggs and vanilla, stir well.
Add pumpkin puree and milk and stir until completely combined.
Gradually stir your dry ingredients into your wet until completely combined, taking care to not overmix the batter.
Gently fold in 1 cup of the chocolate chips.
Evenly divide muffin batter into prepared muffin tins (filling each ¾ full). Sprinkle tops of muffins with the remaining ⅓ cup of chocolate chips and then sprinkle tops generously with sugar.
Bake on 350 for 20-22 minutes (toothpick inserted in the center should come out mostly clean with only a few crumbs).
Allow muffins to cool before enjoying.
Notes
Updated on September 29, 2021Original Post on September 27, 2017
This roasted delicata squash is such a beautiful veggie side dish! Golden slices of delicata squash are piled on top of soft vegan cheese, and then drizzled with a spiced maple syrup, and finished with crisp, savoury rosemary granola.
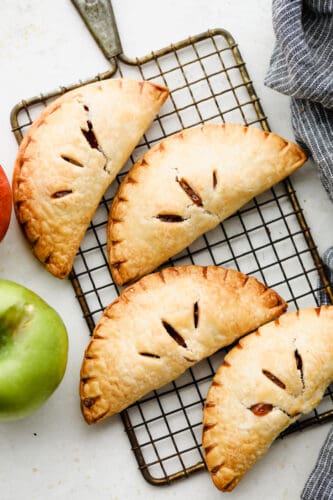
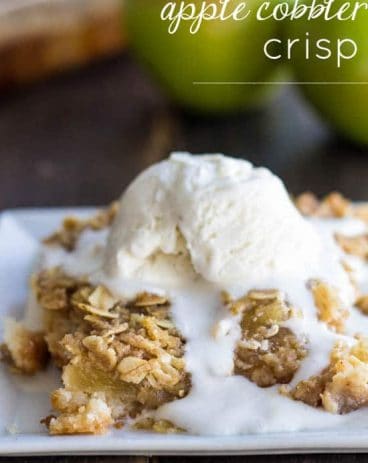
Apple hand pies are a classic dessert that your family will go crazy for! Delicious, flaky and ooey-gooey, these hand pies have the most amazing apple flavor that will have everyone asking for more than one!
This dessert is definitely one that I have made over and over! It’s simple and easy and can be eaten on the go! If you love pies like these, then try out Air Fryer Hand Pies, Blueberries and Cream, or this Cherry Pie! They are all SOO GOOD.
Apple Hand Pies
I love these apple hand pies! They are so cute and delicious. They remind me of my childhood when we would go on a road trip and each get to pick a treat out at the gas station to eat along the way. My dad would always pick out those little hand pies that came in a few different flavors! So when I made these, they totally took me back and made me want to make some of my own to bring on a family road trip! In fact, while you’re at it, go ahead and try making these Air Fryer Hand Pies, and these Blueberries and Cream Hand Pies… They are amazingly delicious as well!
The filling on these is absolutely divine! It is thick and has the more amazing apple cinnamon flavor. You know that I love the filling for a pie and this one is no exception. You know it’s that good when you just want to eat it plain with a spoon! And the crust on these is absolute perfection. It has just the right amount of sweetness and the flaky texture cannot be beaten! Go ahead and try these apple hand pies out! you will always want some on hand (see what I did there??) to eat whenever you want! Enjoy!
Ingredients in Apple Hand Pies
These are so simple to make! The ingredients are common and if you don’t have time, you could even just buy some store-bought pie crust to use. That will make the whole recipe very simple! See the recipe card below for a list of exact ingredient measurements.
Pie Crusts: You can either make your pie from scratch using this homemade pie crust recipe or they can be store-bought!
Tart apples : Dice up your apples to be small cubes that are all the same size.
Lemon juice: The lemon juice will keep your apples looking fresh.
Granulated sugar: This adds a sweet flavor to make it so the filling is overall sweet and not too tart.
Cornstarch: You use cornstarch to thicken up the filling.
Cinnamon: This adds that amazing flavoring to the apples!
Nutmeg: You absolutely have to have nutmeg in any apple recipe! It is what makes it so delicious!
Salt: The salt will enhance the flavors of the other ingredients.
Egg yolk: Using an egg yolk will help your pie crust to have that golden brown crust.
Water: This will be used as part of your egg wash!
Let’s Bake a Pie!
You will absolutely love these apple hand pies. They are so simple to make and you cannot beat a homemade dessert that you can eat on the go!
Filling
Toss: In a medium sauce pan, toss the diced apples together with the lemon juice.
Whisk: In a small bowl whisk together the granulated sugar, cornstarch, cinnamon, nutmeg, and salt. Pour over the apples and stir to combine.
Simmer and cool: Heat the apple mixture over medium heat until the sugar is dissolved and bubbling. Turn the heat down to low and simmer for 2-3 minutes until it begins to thicken. Remove from the heat and let cool completely.
Dough
Prep: Preheat the oven to 375° and line two baking sheets with parchment paper.
Cut and chill dough: In two sections, roll the pie dough out until it’s between ¼ inch and ⅛ inch thick. Using a 3.5-4 inch round cookie cutter, cut out circles. Press the scraps together and roll out again and cut more circles. Chill the circles of dough in the fridge for at least 15 minutes before using.
Assembly
Make egg wash: In a small bowl use a fork to combine the egg yolk and water for your egg wash.
Brush on egg wash: Arrange discs of dough on the wo baking sheets. Going one disc at a time, brush the edges with egg wash. If you are using an empanada mold or a hand pie press, transfer the disc to the mold.
Fill dough and seal: Place about 1-1.5 tablespoons of the apple filling in the center of the dough. Press the mold together, being sure the edges seal well. If you don’t have a hand pie press or empanada mold, fold the dough over and use a fork to crimp the edges together. Repeat with the remaining pies.
Vent, sprinkle with sugar and chill: Use a sharp knife to cut a few slits on top of each pie to allow steam to vent. Brush the tops of each pie with egg wash and sprinkle with course sugar. Place in the fridge to chill for at least 15 minutes before baking.
Bake, cool and serve: Remove from the fridge and bake immediately for 20-25 minutes, until the crust is nice and golden brown. Allow the apple hand pies to cool for at least 15 minutes before serving.
Tips For Apple Hand Pies
Hand Pies are rustic, homey, and delicious! They are fun and easy to make and to help you out, I’ve come up with a few tips that will help these turn out just right!
No homemade dough? No problem: If you want to skip the process of making your own pie dough, don’t sweat it. Skip it and press forward with the pre-made stuff. This recipe is quick and easy with store bought pie dough!
COLD dough: Pie dough can be intimidating, but one of the best ways to work with it is to make sure it stays nice and cold. If you feel like the dough is getting too pliable or too soft, set it in the fridge for 10-15 minutes so that it can chill.
Choosing apples for a recipe: There are several different types of apples that hold up well to baking. Granny Smith apples are nice and tart and hold their shape, while Honeycrisp are sweeter, larger and hold their shape just as well. Braeburn or Pink Lady apples are bursting with flavor and also a popular choice!
Less is more with the filling: Go easy on the filling in each pie and use only 2 tablespoons. This is just the right amount for the hand pies because then they don’t burst and make a mess all over.
How to Store Leftovers
These delightful apple hand pies are the perfect treat for serving kids and family! I especially love them because they travel well and can go with you wherever you go! They hold up well in either the fridge or at room temperature so they will work for a wide variety of events.
Room temperature: Store the hand pies in an airtight container on your counter. They will last like this for 4-5 days.
Refrigerator: Store in the refrigerator in an airtight container in your fridge. They can last in the refrigerator for up to 7 days.
More Apple Desserts to Try
If you love apple flavoring as much as I do, then you definitely need to check out these other apple dessert recipes! There is just something to inviting and cozy about an apple dessert! Maybe because I associate them with holidays and family events. No matter what it is, I know that I can always depend on sweetened apples to make for an excellent recipe! I hope that you enjoy these as much as I do!
Apple hand pies are a classic dessert that your family will go crazy for! Delicious, flaky and ooey-gooey, these hand pies have the most amazing apple flavor that will have everyone asking for more than one!
In a medium saucepan, toss the diced apples together with the lemon juice.
In a small bowl whisk together the granulated sugar, cornstarch, cinnamon, nutmeg, and salt. Pour over the apples and stir to combine.
Heat the apple mixture over medium heat until the sugar is dissolved and bubbling. Turn the heat down to low and simmer for 2-3 minutes until it begins to thicken. Remove from the heat and let cool completely.
Dough
Preheat the oven to 375° and line two baking sheets with parchment paper.
In two sections, roll the pie dough out until it’s between ¼ inch and ⅛ inch thick. Using a 3.5-4 inch round cookie cutter, cut out circles. Press the scraps together and roll them out again and cut more circles. Chill the circles of dough in the fridge for at least 15 minutes before using.
Assembly
In a small bowl use a fork to combine the egg yolk and water for your egg wash.
Arrange discs of dough on the two baking sheets. Going one disc at a time, brush the edges with egg wash. If you are using an empanada mold or a hand pie press, transfer the disc to the mold.
Place about 1-1.5 tablespoons of the apple filling in the center of the dough. Press the mold together, being sure the edges seal well. If you don’t have a hand pie press or empanada mold, fold the dough over and use a fork to crimp the edges together. Repeat with the remaining pies.
Use a sharp knife to cut a few slits on top of each pie to allow steam to vent. Brush the tops of each pie with egg wash and sprinkle with coarse sugar. Place in the fridge to chill for at least 15 minutes before baking.
Remove from the fridge and bake immediately for 20-25 minutes, until the crust is nice and golden brown. Allow the pies to cool for at least 15 minutes before serving.