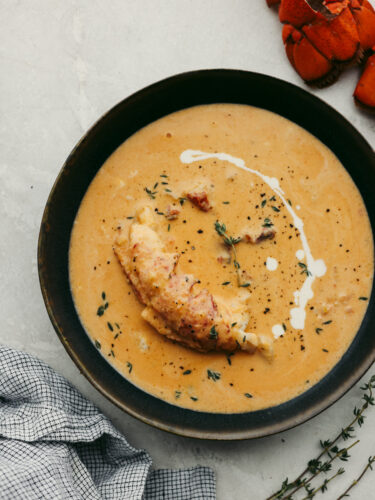
Classy, elegant, and insanely delicious, this lobster bisque needs to make its way to your dinner menu as soon as possible! This recipe is absolutely divine and not one you will want to miss out on!
If you are a lobster lover like myself, you MUST TRY these lobster rolls, this lobster mac and cheese, and of course, these popular lobster tails! They are all so good! You won’t be able to pick a favorite.

The Best Lobster Bisque Recipe
Lobster bisque is the perfect marriage between fancy and elegant and down-to-earth comfort food. You can have all of that fantastic lobster flavor in a creamy soup while sitting by your fire at home. This recipe is filled with delicious ingredients that make the soup incredibly flavorful. Plus, you can dip in a homemade crostini or some bread to really take this soup over the top.
Lobster is usually reserved for special occasions, but with this velvety lobster bisque, you can enjoy this delicious flavor all year long! Lobster bisque is rich and creamy and can be served as an appetizer or main dish! Pair it with some delicious garlic bread and seafood pasta and this meal will get a “WOW!” from all of your guests.
Lobster Bisque Ingredients
Grab the few specialty items, and you will be enjoying this in the comfort of your own home before you know it! Once you look over this list of ingredients, you will realize that you probably have most of these items already in your kitchen! See the recipe card at the bottom of the post for a list of exact measurements.
- Raw Lobster Tails: This meat is what will bring in the flavor of the whole dish!
- Water: This will be the base of your lobster stock.
- Butter: I like to use unsalted butter in this recipe.
- Shallot: Similar to an onion, you will mince up this shallot before putting it in your recipe.
- Carrots: I slice large carrots that have already been peeled.
- Celery: The stalks can be chopped up into whatever size you rprefer. Just make sure that they are all similar in size so that they cook evenly.
- Garlic: Using minced garlic brings a delicious flavor to the lobster.
- Fresh Thyme: You will mince up some to put into the bisque and you should also save a few stems for garnish on top.
- Tomato paste: You don’t need much of this but it adds to the velvety texture of the bisque.
- Flour: I used all-purpose flour in this recipe.
- Dry White Wine: A dry white wine is a wine that isn’t sweet and has a high acidity.
- Heavy Cream: When you mix this in with the stock, you start to get a creamier texture.
- Salt and Pepper: Use these to enhance the flavors of the recipe.
How to Make Lobster Bisque
Before mixing the bisque, you will need to make your lobster stock! I have detailed all of the steps for you so that your lobster bisque turns out perfectly!
Lobster Stock
- Boil water: In a large pot, add 10 cups of water, and bring to a boil. Be sure you have enough water to cover the lobster tails when they are added.
- Add in lobster tails: Add the lobster tails to the pot of boiling water. Cover with a lid and boil for 5 minutes, or until the lobster tails turn bright red.
- Cut and remove lobster meat: Using tongs, remove the lobster tails from the water. Save the liquid in the pot. Allow the lobster to slightly cool. Use kitchen shears to cut down the length of the tail. Split the shell apart and remove the lobster meat from the shell. Set aside the meat, and be sure to save the shells.
- Add shells to water and simmer: Return the shells to the pot of water. Bring to a boil over medium high heat. Reduce the heat, and simmer for 15 minutes.
- Chop: While the stock in simmering, chop the meat into bite-sized pieces and place in the refrigerator while you prepare the bisque. I like to leave some tails whole because it makes the presentation beautiful when serving!
Bisque
- Melt and stir: In a large pot, add the butter and melt over medium heat. Add the diced shallot, carrots, and celery. Continue to stir and cook until soft for about 8 minutes. Stir in the garlic, fresh thyme, and tomato paste, and cook for 1 minute. Sprinkle in the flour and cook for an additional minute.
- Deglaze and thicken: Add the dry white wine to deglaze the pan. Allow the wine to simmer for several minutes while stirring. The mixture should start to thicken.
- Strain stock: Remove the lobster shells from the pot. Measure 5 cups of lobster stock from the pot, and use a fine mesh strainer to strain the stock into the bisque. Reduce heat and let simmer until liquid is reduced and the flavors blend together. While stirring occasionally, this should take about 30 minutes. Once the liquid reduces, the mixture will thicken.
- Blend: Next, remove the bisque from heat. Use an emulsion blender to blend the ingredients together until smooth. You can also carefully transfer the bisque to a standing blender to mix if you prefer.
- Add cream and meat: Once the bisque is blended, add the cream and chopped lobster meat. Stir to combine, and heat for an additional 5 minutes. Season with salt and pepper to taste. *See notes for seasoning.
- Garnish and serve: Garnish with fresh thyme leaves and serve with crusty artisan bread on the side.

Tips for Making Lobster Bisque
There are a few extra things that you can do to make sure that your lobster bisque turns out just right! I’ve answered some FAQs for you so that yours is perfect!
- Add the lobster meat last: This is an important rule to follow! If you add it in too soon then the lobster continues to cook in the bisque and becomes rubbery. Adding it in just before serving will make the texture perfect!
- Thicker consistency: To make your bisque thicker then continue simmering it unil it reaches the desired consistency. If you want a thinner bisque then add some more lobster stock.
- Seasonings: Feel free to flavor your bisque to your liking! You can add more fresh thyme, or even a ½ teaspoon of Herb de Provence or dried Italian seasoning. They would both work and would be a lovely addition.

Do I Serve Lobster Bisque Hot or Cold?
I prefer to serve lobster bisque hot. You can serve it cold as leftovers but I don’t think the flavors are as vibrant. It should be served immediately after you add in the lobster meat.

How to Store and Reheat Lobster Bisque Leftovers
If you have leftover lobster bisque then you are in luck because it makes fantastic leftovers for lunch or dinner the next day! Here is how you can safely store it and reheat it later.
- In the Refrigerator: Once your lobster bisque has cooled then you can place it in an airtight container. Put it in your fridge and it will last 2-3 days.
- To Reheat: Reheat your bisque on the stove on medium heat until warmed through. Enjoy!

More Seafood Recipes to Try


Lobster Bisque
Ingredients
Lobster Stock
- 4 lobster tails, raw
- 10 cups water
Bisque
- 4 Tablespoons butter
- 1 shallot, minced
- 2 large carrots, peeled, diced
- 3 celery stalks, diced
- 2 teaspoon garlic, minced
- 1 teaspoon fresh thyme, minced (save a few stems for garnish)
- 1/4 cup tomato paste
- 1/4 cup all-purpose flour
- 1 1/2 cups dry white wine
- 5 cups lobster stock
- 1 cup heavy cream
- 1 teaspoon kosher salt (more to taste)
- 1/2 teaspoon pepper
Instructions
Lobster Stock
-
In a large pot, add 10 cups of water, and bring to a boil. Be sure you have enough water to cover the lobster tails when they are added.
-
Add the lobster tails to the pot of boiling water. Cover with a lid and boil for 5 minutes, or until the lobster tails turn bright red.
-
Using tongs, remove the lobster tails from the water. Save the liquid in the pot. Allow the lobster to slightly cool. Use kitchen shears to cut down the length of the tail. Split the shell apart and remove the lobster meat from the shell. Set aside the meat, and be sure to save the shells.
-
Return the shells to the pot of water. Bring to a boil over medium-high heat. Reduce the heat, and simmer for 15 minutes.
-
While the stock is simmering, chop it into bite-sized pieces and place it in the refrigerator while you prepare the bisque. I like to leave some tails whole because it makes the presentation beautiful when serving!
Bisque
-
In a large pot, add the butter and melt over medium heat. Add the diced shallot, carrots, and celery. Continue to stir and cook until soft for about 8 minutes. Stir in the garlic, fresh thyme, and tomato paste, and cook for 1 minute. Sprinkle in the flour and cook for an additional minute.
-
Add the dry white wine to deglaze the pan. Allow the wine to simmer for several minutes while stirring. The mixture should start to thicken.
-
Remove the lobster shells from the pot. Measure 5 cups of lobster stock from the pot, and use a fine-mesh strainer to strain the stock into the bisque. Reduce heat and let simmer until liquid is reduced and the flavors blend together. While stirring occasionally, this should take about 30 minutes. Once the liquid reduces, the mixture will thicken.
-
Next, remove the bisque from heat. Use an emulsion blender to blend the ingredients together until smooth. You can also carefully transfer the bisque to a standing blender to mix if you prefer.
-
Once the bisque is blended, add the cream and chopped lobster meat. Stir to combine, and heat for an additional 5 minutes. Season with salt and pepper to taste. *See notes for seasoning.
-
Garnish with fresh thyme leaves and serve with crusty artisan bread on the side.
Notes
Nutrition
source https://therecipecritic.com/lobster-bisque/