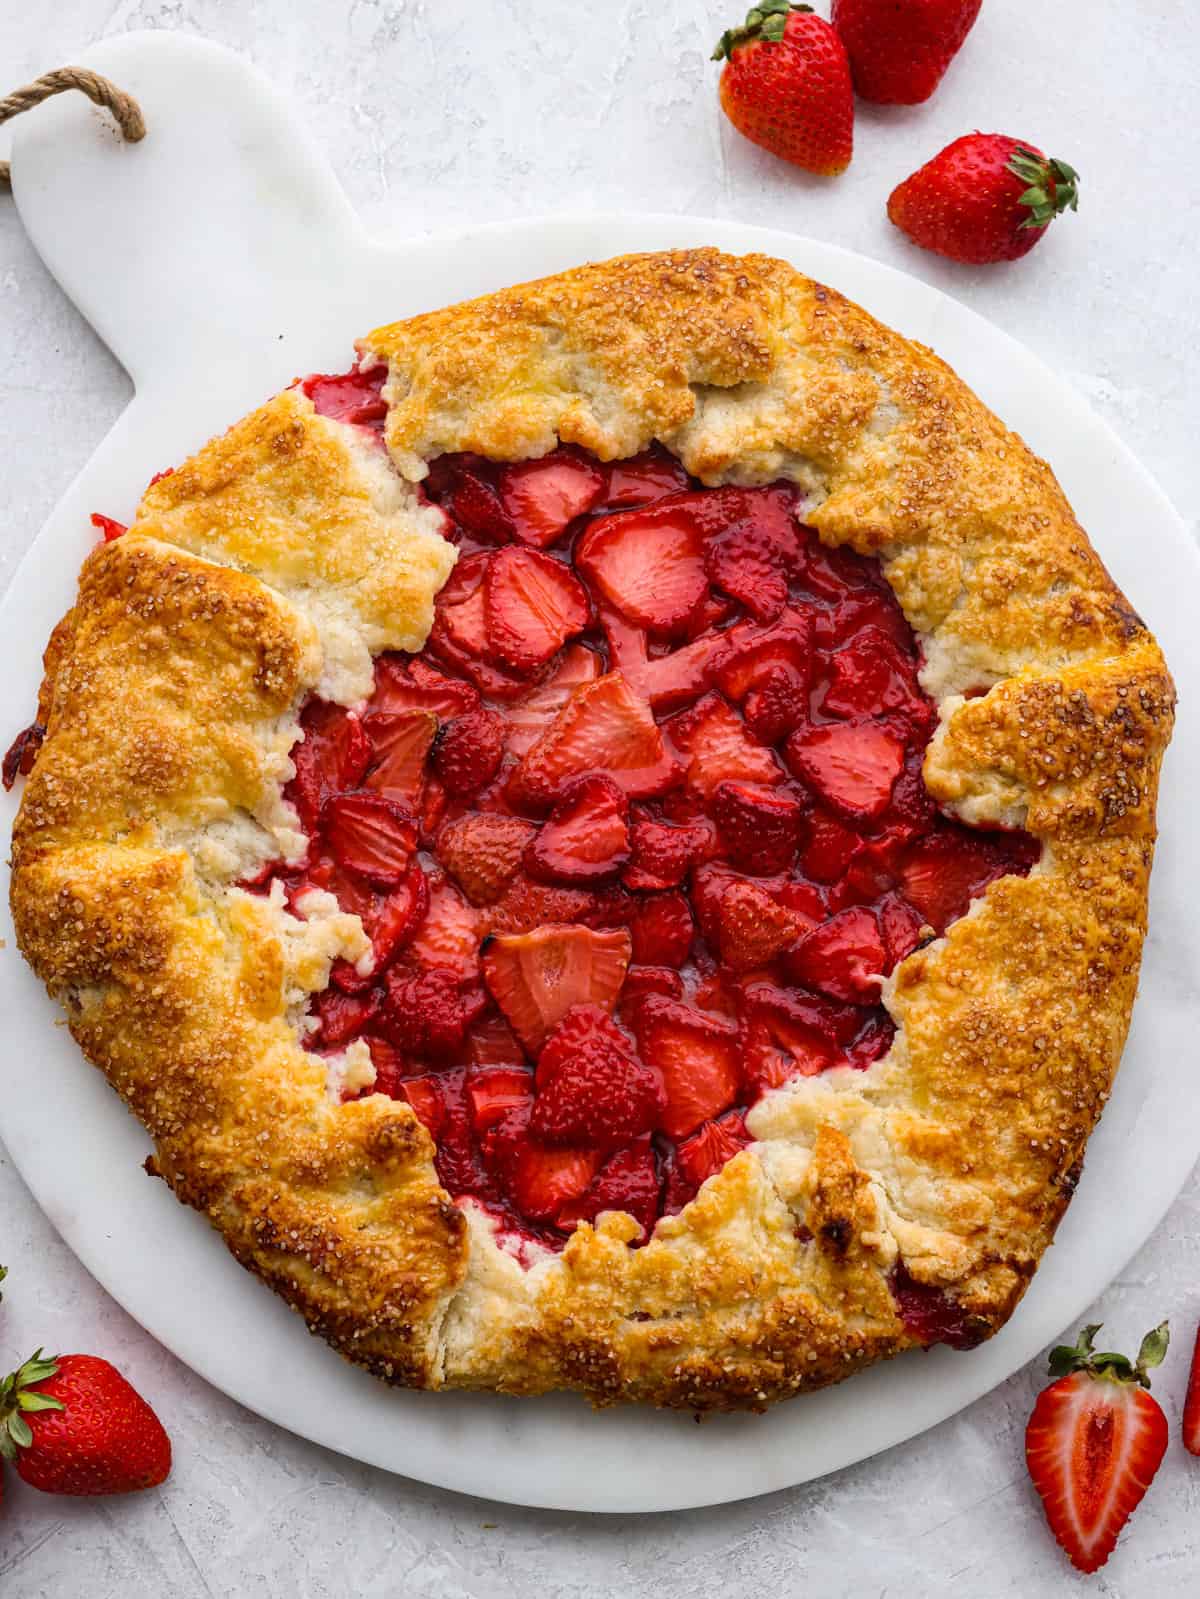
This fresh strawberry galette uses sweetened strawberries that are wrapped in a beautiful rustic buttery pastry and baked to perfection. Strawberry galette is a much easier version of a pie, and it will become your new favorite strawberry dessert!
Fresh berry desserts just have a way of capturing happy childhood memories for me. I loved when my mom would make this delicious fruit pizza, and my kids love when I make these fun cheesecake stuffed strawberries. And if you’re looking for a beautiful cake to make for anyone that loves berries, I highly recommend this cake!

What Is Strawberry Galette?
I can’t stop thinking about this incredible dessert! The combination of the flaky sweet crust with vine-ripened strawberries. My tastebuds were so happy when I took my first bite, and I’m so excited for you to make it.
This French-inspired tart starts with a delicious crust, and then it is filled with sweetened sliced strawberries. This recipe is so simple and straightforward that you’ll want to make a galette for every fruit. Any dessert that starts with my flaky pie crust is a crowd pleaser, like my chocolate pie or my new favorite cookie pie.
Ingredients Needed For Strawberry Galette
The simplicity of this easy strawberry galette recipe is what makes it easy to whip up for a perfect spring or summer dessert. The ingredients needed are basic everyday ingredients you most likely have on hand. Most of the time, I just need to make sure I have strawberries in my garden or stop at the store and grab some! Check out the recipe card at the bottom of the post for exact measurements.
For the Crust:
- All-purpose flour: Create a perfect homemade crust starting with all-purpose flour.
- Salt: Because you are adding salt to the dough, make sure your butter is unsalted.
- Granulated Sugar: A sweet pastry crust is the best base for a fruit dessert!
- Unsalted Butter: Cold unsalted butter is a must! Make sure your butter is very cold and cubed. This is important to achieve a flaky crust!
- Ice Water: Cold ice water keeps the dough chilled for rolling out and is a must when making your own dough for a strawberry galette.
- Egg Yolk: One egg yolk is whisked for the egg wash.
- Water: You’ll be whisking water with the egg yolk for the egg wash.
- Turbinado Sugar: Turbinado sugar is needed for the topping and adds a sweet texture to dessert crusts.
- Apricot Jam: A little apricot jam brushed on top gives the berries a nice beautiful shine!
For the Filling:
- Fresh Strawberries: In-season juicy strawberries make this galette unforgettable.
- Lemon Juice: Lemon juice balances out the flavors
- Granulated Sugar: The sugar helps break down the juices in the strawberries and creates a sweet mixture.
- Cornstarch: This will help thicken the juices from the strawberries, so your strawberry galette doesn’t get soggy.

How to Make Strawberry Galette
I walk you through the whole process of making this delicious strawberry galette, so you have nothing to worry about! I promise you. It is easier than pie and so fun to make. And I much prefer making a fruit-filled galette before a pie any day!
For the Crust:
- Combine Dry Ingredients/ Cut in Butter: In a medium bowl whisk the flour, salt, and sugar together. Add the cold, cubed butter and cut in with a pastry cutter until the butter is pea sized.
- Add Water/Form Dough: Slowly add the cold water and stir with a fork until the dough begins to come together. Turn out onto a lightly floured surface and use your hands to bring the dough together in a disk.
- Wrap and Chill: Wrap the dough in plastic wrap and chill in the fridge for 20 minutes while you prepare the filling.
For the Filling:
- Combine Strawberries and Lemon Juice: Add the sliced strawberries and lemon juice to a large bowl.
- Make Cornstarch Mixture/ Coat Strawberries: In a small bowl, whisk together the sugar and cornstarch. Then, pour it over the strawberries and stir to coat evenly and then set it aside.
Assembly:
- Preheat Oven: Preheat the oven to 400°F and line a baking sheet with parchment paper.
- Roll Out Dough: Remove the dough from the fridge and place it on a lightly floured surface. Using a rolling pin, roll out the dough into a 12-15 inch circle, depending on how thick you like your crust.
- Add Strawberries/Fold Dough: Arrange the strawberries in the center of the dough, leaving about a 2-inch border of dough around the edge. Fold the dough over the strawberries, pinching and pleating to create the free-form edge. This free-form edge is quite forgiving, and you can pinch and tear pieces of dough to make it look how you would like.
- Make Egg Wash: In a small bowl, mix the egg yolk and water together to make the egg wash. Use a pastry brush to brush the crust with the egg wash and then sprinkle with turbinado sugar.
- Bake: Bake for 40-45 minutes, until the crust is nice and golden brown and the filling is bubbly. Allow the galette to cool completely.
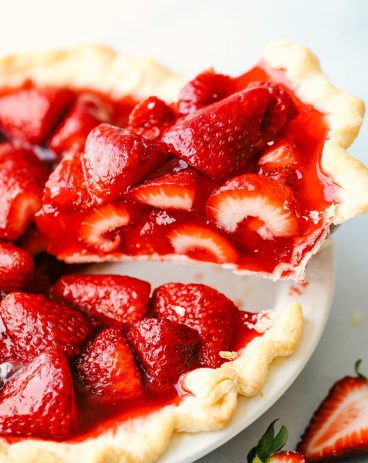
- Brush on Jam: Before serving, heat a tablespoon of apricot jam in the microwave for 10-15 seconds before using a pastry brush to brush the hot jam over the top of the strawberries, giving them a nice shine.
- Serve: Enjoy the strawberry galette warm or at room temperature. I also love it topped with vanilla ice cream or whipped cream!

Tips For Making the BEST Galette
Follow my tips for your Pinterest perfect-looking strawberry galette! It’s much more forgiving than a traditional pie and is an impressive dessert full of rich flavor! Use these great tips to ensure the best result each time you make your galette!
- Use Cold Ingredients: Working with very cold butter and very cold ice water will help your crust be nice and flaky. I like to dice my butter and then throw it in the freezer for about 30 minutes before starting the preparation of the crust. You can even put the measured-out cold water in the freezer for about 10-15 minutes to get it even colder.
- Don’t Work Dough Too Much: If you knead your dough too much, gluten will develop. This will result in a dense, shriveling crust. I like to use a pastry cutter to make my dough, but feel free to use a food processor if you prefer. A food processor will help you achieve the pea size dough. Just be careful not to over-mix the dough.
- Don’t Overfill: One difference between a galette and a pie is the amount of fruit in the filling. Pies are typically stuffed full of fruit, whereas galettes bake more evenly when there is an even layer of fruit. Avoid overstuffing and then if you have too much filling in the crust, leave any extra berries out.
- Apricot Glaze: This is an optional step, but adding the apricot glaze to the top of the strawberries will take your galette over the top and give it that wow factor for presentation. Also, a little lemon zest on top would be delicious and lovely for serving!

Storing Leftovers
Strawberry galette is just as good the next day as it is fresh! I even make it a day in advance to save time when I have dinner guests.
- Room Temperature: My favorite way to store leftovers of this galette (if there is any left over!) is on a plate or baking sheet covered tightly with plastic wrap. It will keep for about 3-4 days at room temp.
- In the Refrigerator: You can extend the shelf life of this galette by storing it in the fridge instead of on the counter. Wrap it tightly with plastic wrap on a plate or baking sheet. You can keep it in the fridge for up to 6 days. Reheat in the microwave for 20-30 seconds or enjoy cold.

More Fruit Desserts To Try

Strawberry Galette
Ingredients
Crust
- 1 ½ cup all-purpose flour
- ¾ teaspoon salt
- 2 tablespoons granulated sugar
- ¾ cup unsalted butter, very cold and cubed
- ¼ cup ice water
- 1 egg yolk (for egg wash)
- 2 tablespoons water (for egg wash)
- Turbinado sugar (for topping)
- Apricot jam (for glaze)
Filling
- 1 ½ pounds fresh strawberries, sliced
- 1 teaspoon lemon juice
- 1/3 cup granulated sugar
- 1 tablespoon cornstarch
Instructions
Crust
-
In a medium bowl whisk the flour, salt, and sugar together. Add the cold, cubed butter and cut in with a pastry cutter until the butter is pea sized.
-
Slowly add the cold water and stir with a fork until the dough begins to come together. Turn out onto a lightly floured surface and use your hands to bring the dough together in a disk.
-
Wrap the dough in plastic wrap and chill in the fridge for 20 minutes while you prepare the filling.
Filling
-
Add the sliced strawberries and lemon juice to a large bowl.
-
In a small bowl, whisk together the sugar and cornstarch. Pour over the strawberries and stir to coat evenly. Set aside.
Assembly
-
Preheat the oven to 400°F and line a baking sheet with parchment paper.
-
Remove the dough from the fridge and place it on a lightly floured surface. Using a rolling pin, roll out the dough into a 12-15 inch circle, depending on how thick you like your crust.
-
Arrange the strawberries in the center of the dough, leaving about a 2-inch border of dough around the edge. Fold the dough over the strawberries, pinching and pleating to create the free-form edge. This free-form edge is quite forgiving, and you can pinch and tear pieces of dough to make it look how you would like.
-
In a small bowl, mix the egg yolk and water together to make the egg wash. Use a pastry brush to brush the crust with the egg wash and then sprinkle with turbinado sugar.
-
Bake for 40-45 minutes, until the crust, is nice and golden brown and the filling is bubbly. Allow the galette to cool completely.
-
Before serving, heat a tablespoon of apricot jam in the microwave for 10-15 seconds before using a pastry brush to brush the hot jam over the top of the strawberries, giving them a nice shine.
-
Enjoy the galette warm or at room temperature. I also love it topped with vanilla ice cream or whipped cream!
Nutrition
source https://therecipecritic.com/strawberry-galette/