Easy, delicious, and adorably festive, this Dinner Roll Wreath is perfect for holiday dinners! Warm and soft rolls arranged to look like a wreath are sure to spruce up your holiday dinner table.
Bread is one of my favorite things to make. It is so satisfying to watch the dough rise, and come out of the oven golden and delicious. It also makes the house smell like a dream! If you love making bread or want to give it a try, you’ve got to try this Cinnamon Bread, or this perfect for fall Apple Bread, or one of my favorites, this Amish Friendship Bread.

Dinner Roll Wreath
This just might be your new Christmas dinner tradition! It’s so simple to make and it turns out absolutely stunning. It’s easy to make ahead of time so that it’s ready for the big day. Not to mention how gorgeous it looks as a centerpiece for your table. It’s not a complicated recipe either. You don’t need to be a pro at making bread for these rolls to turn out perfectly soft, fluffy, and delicious.
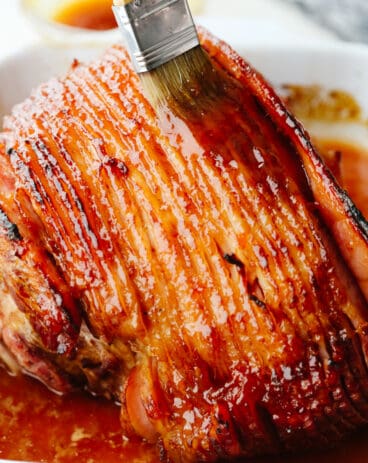
I love Christmas dinner, fit with a juicy Apricot Glazed Ham and tons of sides (mashed potatoes always make an appearance). If you are getting tired of repeats, or just want to start a new tradition this is the recipe for you. This dinner roll wreath saved my table and my holiday spirit. It is so fun to make and each year you can garnish or flavor it differently. This recipe will never get tired!
Ingredients
I bet you already have all of these recipes in your pantry! Well, you might have to go out and get some yeast if you aren’t a frequent bread maker. But other than that, you’ve got everything you need to make a new holiday tradition! For exact measurements, see the recipe card below.
- All-Purpose Flour: It’s the easiest to work with for this recipe.
- Granulated Sugar: A little sugar helps the bread to rise better and gives it a nice flavor.
- Rapid Rise Yeast: You want to get rapid rise because we are only doing one rise for this recipe.
- Salt: A little salt brings out all the great flavors in this bread.
- Milk: Your milk should be warm, which means between 110 and 120 degrees. It should be warm to the touch but not hot.
- Butter: You will want to use unsalted butter.
- Italian Seasoning: This blend makes a great savory flavor in the bread.
- Fresh Rosemary: This is for garnish around the rolls. It looks like a pine tree branch so it’s perfect for the season.
- Fresh Cranberries or Pomegranate Seeds: These add a great pop of color, and awesome flavor too. Something red on your wreath is a must!

Dinner Roll Wreath Recipe
If you haven’t made bread before, don’t be intimidated! You can totally make this dinner roll wreath, and I’ve written out each step with lots of details so that it will be easy to follow. You will be so happy with how it turns out!
Make the Dough
- Prep Baking Station: Set the oven to warm, or as low as it will go if you don’t have a warm option (about 170℉). Line a large baking sheet with parchment paper. Spray a small glass (oven-safe) bowl or storage dish with cooking spray and place upside down in the center of the baking sheet. Set aside.
- Mix Dough: In the bowl of a mixer, whisk together the flour, sugar, yeast and salt. In another bowl, combine the warm milk and 6 tablespoons of melted butter.
- Knead: Using the dough hook attachment on low, slowly add the liquid to the dry ingredients. Knead the dough for 8-10 minutes, until it is smooth and elastic. If the dough is still very sticky and sticks to your fingers, add more flour 1-2 tablespoons at a time.
- Rest: Once you have achieved smooth dough, cover the bowl and let it rest for 10-15 minutes.
- Divide Dough: Once the dough has rested, turn it out onto a lightly floured surface and divide the dough into four even sections. Divide each section into 6 smaller, even sections so you have a total of 24. If you would like a precise weight, use a kitchen scale to measure your dough’s weight in grams before dividing it. Divide that number by 24 and then weigh 24 individual balls of dough with that weight.
Shape, Let Rise, and Bake
- Shape: Shape each section of dough into a small ball and pinch the dough together at the bottom. Place 10 of the balls around the glass bowl to form the inner ring of the wreath. Use the remaining 14 balls to form the outer ring.
- Let Rise: Cover the rolls with a clean kitchen cloth and set in the warm oven to rise until doubled in size, about 45-60 minutes. I find it helpful to use a clean spray bottle to spray the sides and bottom of my oven with water to create steam. This will help accelerate the rising time.
- Bake: Remove the rolls from the oven once they have doubled in size and bump the oven temperature up to 375℉. Gently brush the rolls with the remaining melted butter and sprinkle with Italian seasoning. As soon as the oven has reached 375℉, place the rolls back in the oven and bake for 16-18 minutes, until the tops are a deep golden brown.
- Cool and Garnish: Let the rolls cool before gently removing the glass bowl from the center. Serve on a large platter and garnish with sprigs of fresh rosemary and a sprinkle of fresh cranberries or pomegranate seeds. If desired, add a bowl of your favorite spread or dip right in the center!
How to Make Dinner Roll Wreath by Hand
If you don’t have a stand mixer with a dough hook, you can still make this recipe! And it will take you about the same amount of time. I personally love making bread by hand because it feels like art. Here are some tips to adapt this recipe.
- Get a Large Bowl: Instead of putting your dough ingredients in the mixer, put them in a large bowl. Use a hand whisk for the first step and then use a wooden spoon when you start adding wet ingredients.
- Knead on the Counter: You will take the dough out of the bowl to knead it on a lightly floured surface. You will knead for 5-10 minutes. Your hands will help develop the gluten and warm the dough so it will combine quickly. If the dough is still really sticky and unmanageable, knead in 1 tablespoon of flour at a time until it is the right consistency.

Tips for Making a Dinner Roll Wreath
Here are some simple tips to make the most out of this recipe!
- Watch Temperatures: You’ve got to make sure the temperature of your milk isn’t too high when adding it to your yeast mixture. The sweet spot is about 100-110 degrees Fahrenheit. If you add liquids that are too hot, they will kill your yeast and you’ll have to start the whole process over.
- Moisture Helps Rising Process: To create the best rising environment for your rolls, set the oven to “warm”, or 170℉, and place the covered rolls in the warmed oven. Use a clean spray bottle to spray water on the bottom and sides of the oven, shutting the door quickly to trap in the steam. This will help accelerate the rising process. You may need to check on the rolls sooner than the recipe suggests since it can speed things up significantly. Be sure to remove the rolls from the oven before increasing the temperature for baking.
- Use Oven-Safe Glass Bowl: Be sure the bowl you use in the center of your rolls is oven safe. If you don’t have an oven-safe bowl, simply remove the bowl after the rolls have risen and bake without one. The center circle may shrink just a little, but it will still maintain a wreath shape!
- Experiment with Decor: Dress the roll wreath up with fresh herbs, fresh cranberries or pomegranate seeds, or even make a decorative bow out of holiday ribbon! You could also use additional herbs like parsley or thyme.

Storing Leftovers
This Dinner Roll Wreath is great for making ahead of time because it stays good for 5 days. For the best tasting rolls on the big day, make them no more than 24 hours ahead of time.
On the Counter: Cover your rolls with plastic wrap or put them in an airtight container and leave them on your counter. They will stay fresh for up to 5 days. They dry out a little bit every day, so it’s best to eat them fresh!
Other Holiday Recipes
Side Dishes
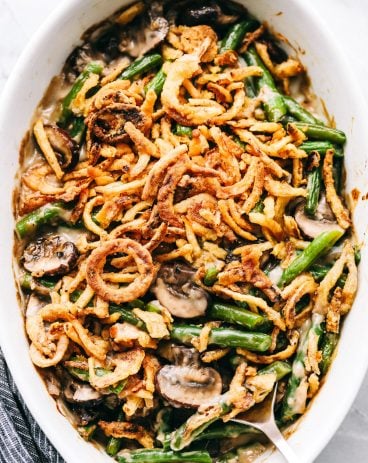
World’s Best Green Bean Casserole

Side Dishes
The Best Creamy Scalloped Potatoes of Your Life!

Dinner Roll Wreath
Ingredients
- 5 1/3 cups all-purpose flour
- 4 ½ tablespoons granulated sugar
- 1 ½ tablespoons rapid rise yeast
- 2 ¼ teaspoons salt
- 1 ¾ cup milk warm
- 9 tablespoons unsalted butter melted and divided
- 1/2 teaspoon Italian seasoning
- Sprigs fresh rosemary for garnish
- Fresh cranberries or pomegranate seeds for garnish
Instructions
-
Set the oven to warm, or as low as it will go if you don’t have a warm option (about 170℉). Line a large baking sheet with parchment paper. Spray a small glass (oven-safe) bowl or storage dish with cooking spray and place upside down in the center of the baking sheet. Set aside.
-
In the bowl of a mixer, whisk together the flour, sugar, yeast and salt. In another bowl, combine the warm milk and 6 tablespoons of melted butter.
-
Using the dough hook attachment on low, slowly add the liquid to the dry ingredients. Knead the dough for 8-10 minutes, until it is smooth and elastic. If the dough is still very sticky and sticks to your fingers, add more flour 1-2 tablespoons at a time.
-
Once you have achieved smooth dough, cover the bowl and let it rest for 10-15 minutes.
-
Once the dough has rested, turn it out onto a lightly floured surface and divide the dough into four even sections. Divide each section into 6 smaller, even sections so you have a total of 24. If you would like a precise weight, use a kitchen scale to measure your dough’s weight in grams before dividing it. Divide that number by 24 and then weigh 24 individual balls of dough with that weight.
-
Shape each section of dough into a small ball and pinch the dough together at the bottom. Place 10 of the balls around the glass bowl to form the inner ring of the wreath. Use the remaining 14 balls to form the outer ring.
-
Cover the rolls with a clean kitchen cloth and set in the warm oven to rise until doubled in size, about 45-60 minutes. I find it helpful to use a clean spray bottle to spray the sides and bottom of my oven with water to create steam. This will help accelerate the rising time.
-
Remove the rolls from the oven once they have doubled in size and bump the oven temperature up to 375℉. Gently brush the rolls with the remaining melted butter and sprinkle with Italian seasoning. As soon as the oven has reached 375℉, place the rolls back in the oven and bake for 16-18 minutes, until the tops are a deep golden brown.
-
Let the rolls cool before gently removing the glass bowl from the center. Serve on a large platter and garnish with sprigs of fresh rosemary and a sprinkle of fresh cranberries or pomegranate seeds. If desired, add a bowl of your favorite spread or dip right in the center!
Nutrition
source https://therecipecritic.com/dinner-roll-wreath/