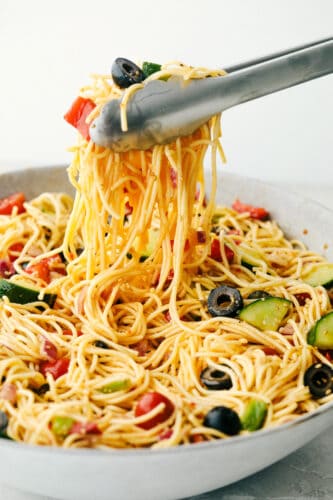
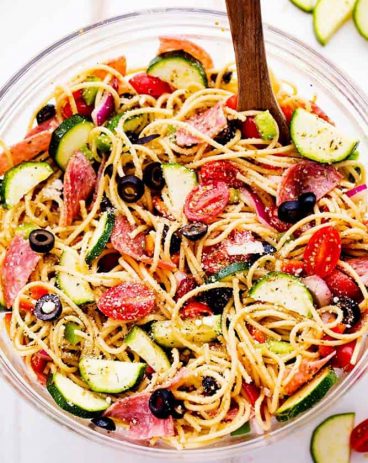
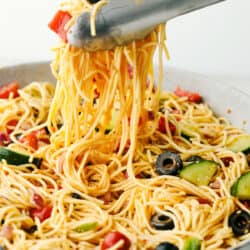
California Spaghetti Salad is a delicious pasta salad filled with fresh veggies and covered in a zesty Italian dressing. With all those flavors and colors making one beautiful and tasty side dish, there is no doubt this will be the hit of your next gathering!
I love delicious, cool salads in Spring and Summer like Creamy Pea, Cauliflower Broccoli, and Cucumber Tomato Salad. Enjoy your salad at your next BBQ!

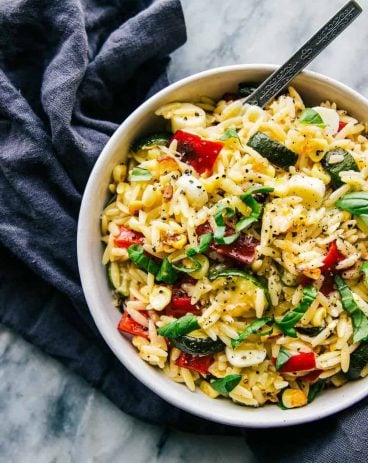
Easy California Spaghetti Salad
As the weather begins to change and warm up in the Spring, I find myself looking for recipes with a fresher and lighter feel. I especially love quick and easy cold pasta salads! This one only took 15 minutes to make and it was amazing! It is vegan-friendly so it is great to bring to a potluck! It is also super versatile! Have fun choosing colorful, fresh fruits and veggies you love to add in! I sometimes swap out the olives for sun-dried tomatoes and I love it that way too!
You really can’t go wrong with this salad! It is great to make ahead because it tastes better as it sits. I love packing it for my kids in their lunches to change it up from sandwiches every day. We even love taking it on a picnic! It is such a treat! All of the amazing veggies packed inside add so much texture, flavor, and color to the pasta. The zesty Italian dressing coated throughout this pasta is so good. It is the perfect finishing touch to this pasta salad. It is easy to make at home and so incredible! I use it on tons of salads, not just this one! Trust me when I say that this California Spaghetti Salad will be a huge hit wherever it goes!
The Best California Spaghetti Salad Ingredients
- Spaghetti: Use thin linguine and break into 1-inch pieces to make it easier to eat.
- Cherry tomatoes: Chopped them in half to make them more bite-sized.
- Zucchini: Make sure you dice everything to similar sizes as much as possible.
- Cucumber: The cucumber gives this salad the fresh taste I love.
- Bell peppers: I used red and green but swap for yellow peppers if you prefer. Make this recipe your own!
- Red onion: If you don’t like biting into the raw onion, marinate them in the dressing first to lessen their strong flavor.
- Olives: The olives are very salty and delicious!
Salad Dressing Ingredients
- Italian salad dressing: Use any Italian dressing you love because you are going to amp it up with all the other seasonings to create your own version of this staple dressing.
- Parmesan cheese: Grated and combined with the dressing to cover each part of the salad with its great nutty flavor.
- Sesame seeds: Add a rich, nutty flavor to the dressing.
- Paprika: Adds great color to this dressing.
- Celery seed: These little seeds pack all the powerful flavors of celery- earthy, grassy and slightly bitter- that balance out this dressing.
- Garlic powder: The extra garlic powder helps the flavor stay strong even when chilled.
How to Make Spaghetti Salad
- Cook the pasta: Make according to package directions. Drain and rinse in cold water.
- Combine all ingredients: Add cherry tomatoes, zucchini, cucumber, green and red bell pepper, red onion and olives to the pasta in a large bowl.
- Make the dressing: Whisk together Italian salad dressing, Parmesan cheese, sesame seeds, paprika, celery seed, and garlic powder.
- Toss the salad in dressing: Pour dressing over salad and toss until coated. Cover and refrigerate for 3 hours or overnight.

Tips for making the Perfect California Pasta Salad
- Vegetables: Get creative with this versatile dish and swap out vegetables. For example, try favorites like broccoli or yellow and orange bell peppers.
- Pasta: Use other pasta shapes. Some of my favorites like rotini or farfalle would work fantastic!
- Cooling Pasta:This pasta salad is best when it’s fresh out of the fridge. So, keep it cooling until right before serving.
- Make it Ahead: This is a great make-ahead recipe! It’s even better the next day, so I usually make it the day before and store it in the refrigerator overnight. This really gives all the flavors time to combine and soak into the pasta!
- Pasta Tip: After draining the salad, dunk the pasta in an ice bath (equal parts water and ice in a large bowl) to shock them. Then, your noodles will not soak up too much of the dressing and become gummy.
 Best Places to Take California Spaghetti Salad Dish
- BBQ or Potluck: A cookout with friends and/or family. As the weather warms up, a cool salad is a perfect side!
- Family Gatherings: Family reunion in a pavilion by the river. This dish travels well, just keep it in the cooler until right before you serve.
- Work Lunch: Potluck at work. (Depending on where you work
 )
) - Lunches! This salad keeps well in the fridge for 5 days so it is perfect for make-ahead weekly lunches!

More Pasta Salad Recipes to Try!
California Spaghetti Salad
Ingredients
- 1 pound thin spaghetti broken into 1 inch pieces
- 1 pint cherry tomatoes chopped in half
- 2 zucchini medium, diced
- 1 cucumber large, diced
- 1 green bell pepper medium, diced
- 1 red bell pepper diced
- 1 red onion large, diced
- 2 cans ripe olives 2-¼ ounces each sliced, drained
DRESSING:
- 1 bottle Italian salad dressing 16 ounces
- 1/4 cup Parmesan cheese grated
- 1 tablespoon sesame seeds
- 1 teaspoon paprika
- 1/2 teaspoon celery seed
- 1/4 teaspoon garlic powder
Instructions
-
Cook the pasta according to package directions. Drain using a colander and rinse in cold water. Add cherry tomatoes, zucchini, cucumber, green and red bell pepper, red onion and olives in a large bowl.
To make the dressing:
-
Whisk together italian salad dressing, parmesan cheese, sesame seeds, paprika, celery seed, and garlic powder. Pour over salad and toss until coated. Cover and refrigerate for 3 hours or overnight.
Video
Notes
Nutrition
source https://therecipecritic.com/california-spaghetti-salad/