Spaghetti doesn’t hold sauce. Angel hair goes from zero to mush. Wagon wheels are gimmicks. These are just a few of Dan’s many frustrations with classic pasta shapes. Three years ago he set out to do better when he embarked on a quest to invent a new pasta shape, actually get it made, and actually sell it. And things have not gone as planned. Starting today, we’re telling the story of Dan’s quest in a five-part series; part 2 is also up now. Will the world have a new pasta shape? Or will Dan’s dreams fall as flat as an overcooked rigatoni? //
Get 500+ more great Sporkful episodes from our catalog and lots of other Stitcher goodness when you sign up for Stitcher Premium:www.StitcherPremium.com/Sporkful(promo code: SPORKFUL).
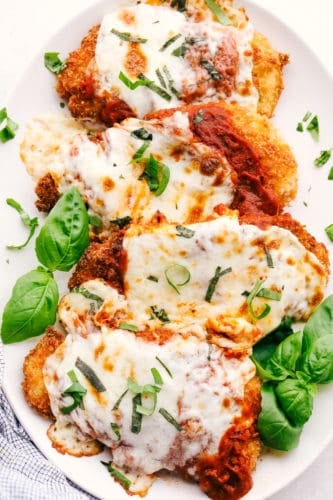
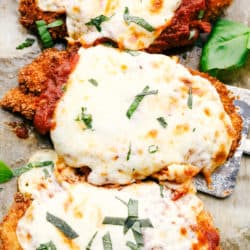
Chicken Parmesan is the best kind of pub grub and it is incredibly easy to make at home. Juicy chicken, baked with a simple pasta sauce and cheese straight from the oven is really the best kind of meal. This is a family friendly meal that everyone is going to love. Chicken Parm is easier than you think too. In no time you can have this restaurant worthy meal in the comfort of your own home. It is so good!
Chicken parmesan is a classic American Italian dish that is layered with flavor. It starts with the incredible marinade that infuses the chicken and keeps it tender. Then comes the breading on the chicken that is fried to a perfect golden brown. Then the chicken is smothered in homemade marinara and topped with flavorful ooey gooey melty cheese. This is epic. It is a tried and true insanely delicious, and easy Chicken Parmesan!
Ingredients for Easy Chicken Parmesan
Either buy chicken breasts that are already sliced and thin, or pound them our or slice your own.
Chicken Breasts: The thinner and more even the chicken the better it will cook
Salt: Add for seasoning.
Italian Seasoning Mix: This is one of the best flavor combinations. Make your own for even better flavor.
Breading Around the Chicken
Flour: Allows it to all come together.
Eggs: The necessary binder.
Garlic Powder: Good flavor enhancer.
Salt: Add more or less to taste.
Panko Breadcrumbs: Do not substitute for bread crumbs.
Parmesan: The star of the show, it is called chicken parmesan for a reason.
Vegetable or Canola Oil: This is used for frying.
Topping the Chicken!
Pasta Sauce or Marinara: Use your favorite jarred sauce or make your own.
Mozzarella: For best results use fresh mozzarella.
Parmesan: Fresh is best.
Olive Oil: The classic Italian oil.
Making Chicken Parmigiana
Quick and easy, you are going to love this classic gourmet meal.
Chicken Marinade: Slice Each chicken breast in half lengthwise and sprinkle with salt and Italian seasoning mix. Set aside
Prep: Preheat oven to 350 degrees.
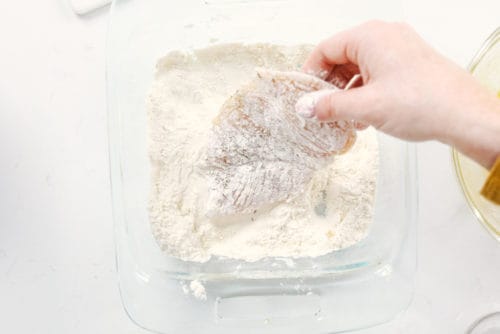
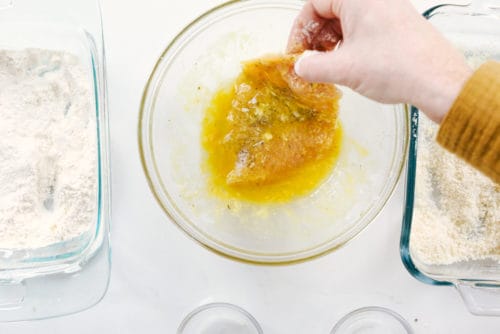
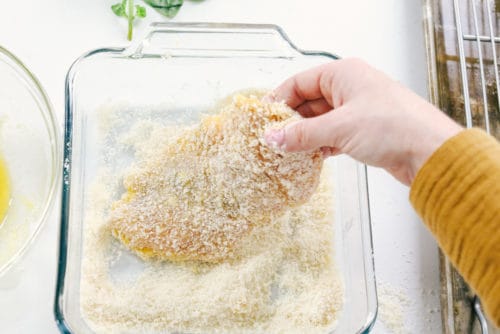
Breading Station: You’ll need 3 dishes for this. Place flour on a plate or shallow dish. In a deep dish, whisk together egg, salt and garlic powder. Mix panko breadcrumbs and parmesan in another dish.
Flour: First dust the chicken with flour.
Egg: Then dip it well into the egg mixture. Shake off excess egg.
Breadcrumbs: Last coat the chicken in the parmesan panko mixture.
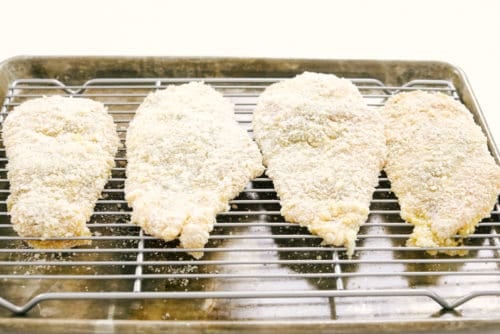
Rest: Place the chicken on a wire rack and repeat with remaining chicken.
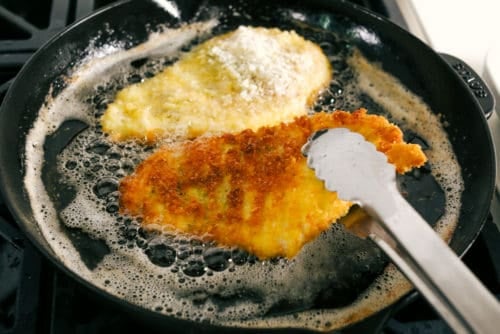
Fry: Heat oil on medium high heat in a skillet to 350 degrees. Place 2 chicken breasts gently in the oil and fry on each side for 2-3 minutes. Remove and place on a wire rack.
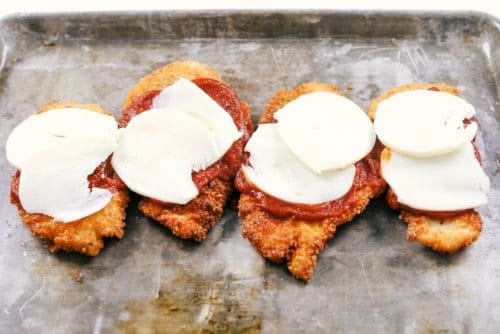
Bake: Place the fried chicken on a baking tray. Spread sauce on top of each piece of chicken and then top with a mount of grated mozzarella. Sprinkle parmesan and drizzle with a little olive oil. Bake for 15 minutes in the preheated oven.
Tips for Divine Chicken Parmesan
Marinate: To get the schnitzel right, marinate them with some salt and Italian seasoning. Just 15 minutes helps infuse the breasts with flavor, and keeps them tender. Do this first while you prepare everything else.
Panko: Do not substitute regular bread crumbs for panko. Panko breadcrumbs are larger and dryer than normal breadcrumbs so they absorb less moisture producing a much crispier coating.
Cook Time: Do not worry about your chicken being underdone when you fry it. The chicken will finish cooking in the oven. Focus on frying it a perfect golden color.
Sauce: You can easily use store bought pasta sauce for this recipe or you can try out simple marinara sauce. Whichever you use, it needs to be a thick consistency. Anything too watery and it’ll make the crumb extremely soggy while baking.
Cheese: Use fresh mozzarella that you slice or grate yourself. Other mozzarella usually has anti caking agents on them so they don’t melt as nicely.
What to Serve with Oven Baked Chicken Parmesan
We love serving Chicken Parmesan with spaghetti tossed in a little olive oil and reserved pasta sauce. But you can also serve it with a side of lightly dressed salad greens, steamed or roasted broccoli, cheesy garlic bread or even mashed potatoes. This has so much flavor that you really don’t need much. Chicken Parmesan is one of the best kind of comfort foods. It looks delicious and tastes absolutely amazing when you serve it on the table!
Leftover Homemade Chicken Parmesan
Refrigerator: Most of the time there is nothing better than leftover Italian food. The flavors really meld overnight and are better the next day. While the flavors in Chicken Parmesan might be better the next day, it will lose that crispy crust. These will keep for 3-4 days in the fridge in an airtight container.
Reheat: It is best to reheat in the oven, stove top in a frying pan or even air fryer but the microwave is the quickest.
More Parmesan Recipes
Parmesan can take an ordinary dish to extraordinary! It is rich, nutty, salty, fruity, sharp and complex. It makes the any dish divine. The gritty texture makes it perfect for grating and shaving. Parmesan cheese is a flavor enhancer and is awesome as a garnish, or topping cheese. Blend it with other cheeses for impressive fillings with great flavor and texture. For more recipes that showcase the wonders of parmesan try these tried and true favorites.
Slice each chicken breast in half lengthwise and sprinkle with salt and italian seasoning mix. Set aside.
Preheat oven to 350F
Breading Chicken
Create a breading station by placing flour on a plate. In a deep dish, whisk together egg, salt and garlic powder. Mix panko breadcrumbs and parmesan in another plate.
Dust the chicken with flour.
Then dip it well into the egg mixture, shake off excess egg.
Last coat the chicken in the parmesan panko mixture.
Place the chicken on a wire rack and repeat with remaining chicken.
Frying Chicken
Heat oil on medium high heat in a skillet to 350F. Place 2 chicken breasts (if they fit) gently in the oil and fry on each side for 2.5 minutes. Remove and place on a wire rack.
Bake
Place the fried chicken on a baking tray. Spread sauce on top of each piece of chicken and then top with a mount of grated mozzarella. Sprinkle parmesan and drizzle with a little olive oil. Bake for 15 minutes in the preheated oven.
Serve with your favorite side from the options above!
Notes
Updated on February 28, 2021Originally Posted on September 25, 2020
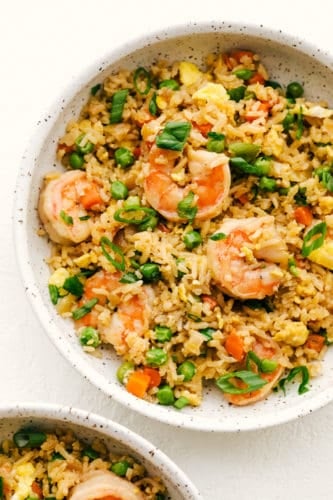
Shrimp Fried Rice is better than any restaurant that you have had! Made with fresh shrimp, peas, carrots, egg, rice and topped with green onions, you will never have takeout again!
Fried rice is a staple in our house, and there are so many ways you can make it amazing. Try Original, Bacon or even Cauliflower fried rice!
Easy Shrimp Fried Rice
After I perfected the better than takeout fried rice… (seriously it is so much better than takeout!) I knew that a shrimp version had to make the debut. The hubby loves shrimp and I have to admit it is starting to grow on me. But when you add it to some fried rice I am in love with it! There is nothing better than rice, peas, carrots, eggs, with shrimp hidden inside!
There are a few secrets to getting that restaurant quality taste. My sister in law who is Chinese made us the most amazing fried rice for a family dinner. She suggests that day old chilled rice is the best. If you have to make the rice that day, it is still delicious! And the secret flavor is the sesame oil. And boy oh boy this rice is good. This is great eaten as a side or by itself. You are going to love the tender shrimp hidden inside. This will become an instant family favorite that will make you have better than takeout meal right at home!
Ingredients for Homemade Shrimp Fried Rice
Super easy and insanely delicious, these ingredients meld together in the most perfect way.
Shrimp: Peeled and deveined, can use fresh or frozen that’s been thawed.
Vegetable Oil: For sautéing.
Sesame oil: The secret to incredible flavor.
Cooked Rice: Use cold day old rice if you have it.
Onion: I used a small white onion for good flavor.
Frozen Peas and Carrots: These should be thawed.
Soy Sauce: Use more or less to taste. Low sodium is ok to use.
Eggs: Lightly beat your eggs.
Green Onion: These are optional, but in my opinion should not be skipped.
Let’s Make Amazing Shrimp Fried Rice!
You will not want to take out again after you taste this shrimp fried rice. It is fast easy and cheaper!
Prep: Preheat a large skillet or wok to medium heat. Add vegetable oil and sesame oil
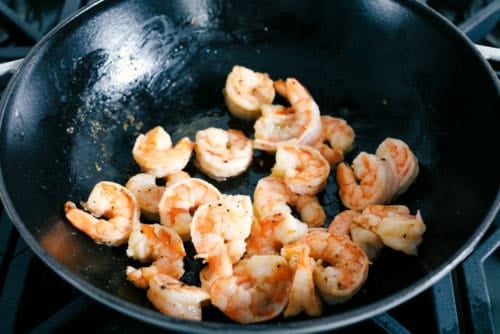
Sauté: Add the shrimp to the skillet and salt and pepper. Cook the shrimp for 2-3 minutes or until no longer pink. Remove with a slotted spoon and set aside.
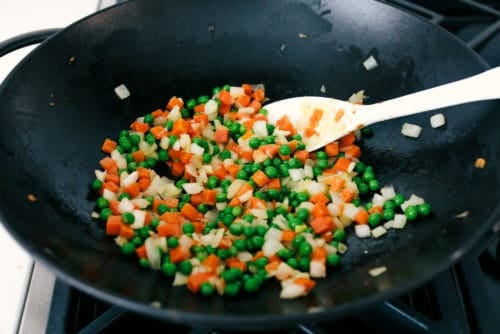
Vegetables: Add the white onion, peas and carrots and fry until tender.
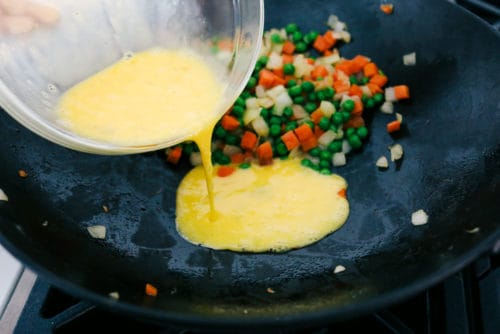
Egg: Slide the onion, peas and carrots to the side and pour the beaten eggs onto the other side. Using a spatula, scramble the eggs, once cooked mix the eggs with the vegetable mix.
Rice: Add the rice and shrimp to the veggie and egg mixture.
Finish: Pour the soy sauce and another Tablespoon of sesame oil on top. Stir and fry the rice and vegetable mixture until heated through and combined. Add chopped green onions if desired.
The Recipe Critic Pro Tip
Cold rice is a Must! If it is a day old cold rice even better. You want the rice cold so it’ll fry when it hits the pan. Using freshly cooked, or even lukewarm rice it will go soggy and clump together. If you need to cook your rice the same day, never fear you can get the same results. Take your cooked rice and spread it out on a sheet pan in thin layer. Cover with plastic wrap. Place in the fridge for up to 30 minutes or freezer for 15, you do not want it frozen, just cold. Trust me on this one.
Tips for the Best Fried Rice with Shrimp
There are a few things that really truly need to be done so this tastes absolutely amazing.
Use some Butter: For impeccable flavor use some butter with your oil or even sub out the oil for butter. It adds so much flavor and goodness.
Use High Heat: This will keep the rice from steaming and fry it well.
Sesame Oil: This is a Must have for the best authentic fried rice flavor. Keep in mind it’s a finishing oil, not a frying oil You need to add it at the end and off the heat.
Use Fresh Shrimp: Using precooked shrimp can make your shrimp rubbery when you warm it up.
Variations and Storing Chinese Fried Rice
This recipe for shrimp fried rice is a classic, but you add, delete and vary ingredients to make it your own.
Vegetables: For a heavy on the vegetable shrimp fried rice, add diced peppers or sautéed mushrooms, and zucchini. You can also use broccoli, cauliflower. Cabbage, green beans or sugar snap peas.
Protein: Add bacon, ham, chicken or tofu to up the protein.
Storage: This shrimp fried rice will keep nicely in an airtight container for up to 3 days in the fridge. Warm up in a skillet or wok to get that fried texture back.
More Better Than Take Out From Home!
There are lots of reasons why you should want to have a few good restaurant worthy recipes in your back pocket. First of all they will always taste better than take out, they are cheaper than take out, and you can control the ingredients and flavors just the way you want them. I have many tried and true restaurant worthy recipes on the blog, but here are just a few favorites to try.
Better than Takeout Shrimp Fried Rice is better than any restaurant that you have had! Made with fresh shrimp, peas, carrots, egg, rice and topped with green onions, you will never have takeout again!!
Preheat a large skillet or wok to medium heat. Add vegetable oil, 1 Tablespoon sesame oil and shrimp to the skillet and salt and pepper. Cook the shrimp for 2-3 minutes or until no longer pink. Remove with a slotted spoon and set aside.
Add white onion and peas and carrots and fry until tender. Slide the onion, peas and carrots to the side, and pour the beaten eggs onto the other side.
Using a spatula, scramble the eggs. Once cooked, mix the eggs with the vegetable mix.
Add the rice and shrimp to the veggie and egg mixture. Pour the soy sauce and 1 Tablespoons sesame oil on top. Stir and fry the rice and veggie mixture until heated through and combined. Add chopped green onions if desired.
*Use day old cold cooked rice for best results. If you don't have precooked rice, it is just fine to cook the rice the same day.
Notes
Updated on February 27, 2021Originally Posted on August 13, 2017
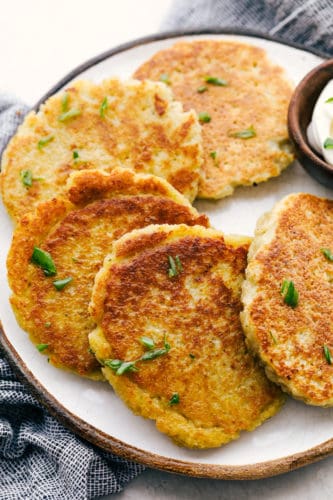
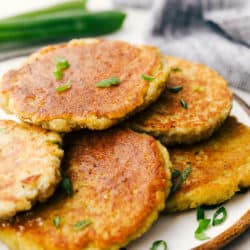
Potato Pancakes are savory crispy little cakes of goodness. You are going to love this fun way to prepare potatoes!
These incredible pancakes go with so many things. Make these potato pancakes as a side dish to remember and serve with Chicken, Salmon or Steak, delicious!
Easy Potato Pancakes
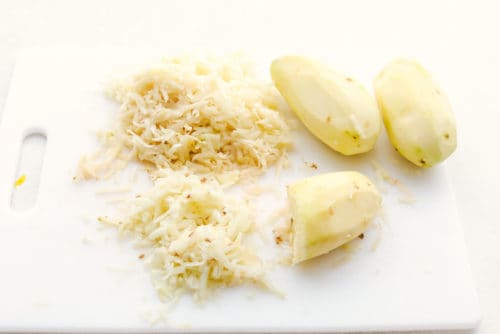
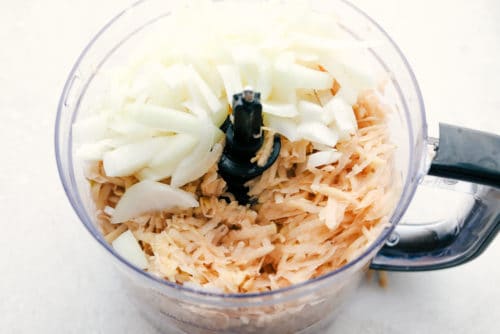
Potato pancakes come by many names. They are also known as German kartoffelpuffer, and Latkes. These are a cross between a french fry and mashed potato. The potato is processed with the onion so you get incredible flavor throughout the entire pancake. Frying it in pancake shape also gives you more surface area to create that crisp golden crust we all love to bite into.
Seasoned with just a bit of salt and pepper really lets these potato pancakes shine. The inside is super tender and perfectly cooked, and the outside crunchy and golden. Using a food processor makes these super easy to whip together. It creates a smooth even texture throughout the pancake that you will absolutely love. You have to try these, they are so scrumptious!
Ingredients for Savory Potato Pancakes
Look for firm potatoes free from any root shoots, cuts, bruises or dark spots. I used a yellow onion but for a mellower taste you can use a sweet onion too.
Potatoes: I used russets, they have less starch so won’t be gummy
Onion: Coarsely chopped.
Eggs: Use large eggs at room temperature.
Flour: All purpose or unbleached will work good.
Salt and Pepper: Add more or less to taste.
Oil: Use a good frying oil, canola or peanut.
Let’s Make Potato Pancakes!
Using a food processor makes creating these potato pancakes a breeze. And only using enough oil to fry them in, and not submerge them, keeps them from being too oily.
Potatoes: Start by peeling and grating your potatoes
Processor: In a food processor add the potatoes and onion. Pulse until desired consistency.
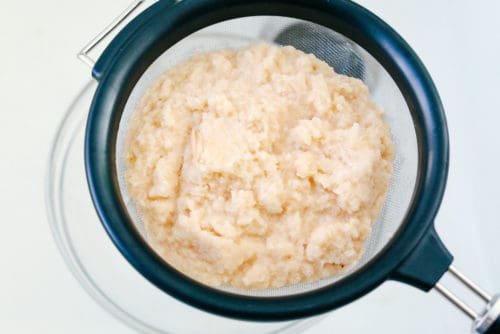
Drain: Remove from food processor and drain out excess liquid in a strainer.
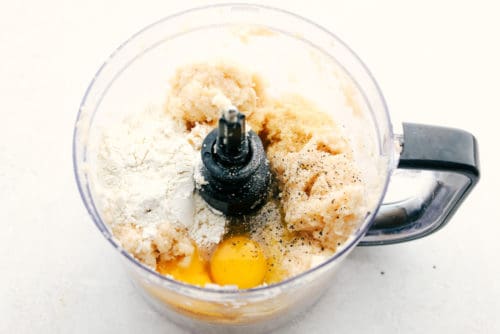
Combine: Add back to the processor along with the eggs, flour, salt and pepper until combined.
Fry: heat a skillet to medium high heat with about 2-3 Tablespoons of oil. Drop ¼ cup of the pancakes into the hot oil. Fry for 2-3 minutes on each side or until golden brown.
Tips for the Best Potato Pancakes
Truly these are really easy. The hardest part is making sure the potato mixture is good and drained. You don’t want mushy potato pancakes. The drier the mixture the crispier the potato pancakes will be. And trying to overcompensate moisture with too much flour, make them taste like flour, could make them gummy and are not what you want.
Strainer: Use a fine mesh strainer. Use a wide spatula to gently push on the potato mixture to push out the liquid.
Dish Towel/ Cheesecloth: Transfer the potato and onion mixture to a dish towel or cheesecloth and squeeze the rest of the water out. You won’t regret the extra work.
Get the Pan Hot: Before you fry the potato pancakes, make sure your oil and pan are good and hot. Use a high smoke oil such as vegetable oil, canola and avocado oil. You can add some butter to the oil for flavor if you want.
Russets Are Best: You don’t potatoes with a high starch content. This makes russets the most ideal for this recipe.
It’s Turning Brown: Don’t worry if they turn a bit brown as you are working with them. Similar to apples as soon as the flesh is oxidized it will begin to turn. It will not affect the taste, but don’t let it sit too long. Work quickly having everything ready before you start to grate.
Variations for Classic Potato Pancakes
The classic potato and onion flavor is delicate and well balanced. You can certainly play with the flavors adding spices and herbs.
Spices: If you want to put a spin on the potato pancakes add different spices according to your taste. Try chili powder, garlic powder, turmeric, basil, oregano, parsley, chives or Italian Seasoning.
Top it: Skip the extras in the pancakes and add flavor to the top. Traditional toppings include sour cream or applesauce. You can top them ketchup, fry sauce, BBQ sauce, Yum Yum Sauce, Ranch or leave them plain.
When to Have Them: These potato pancakes make a great appetizer, side dish or even breakfast side dish. I say make them whenever the craving strikes.
How to Serve Perfect Potato Pancakes
Besides having them as a side or appetizer you can use these tasty pancakes to sandwich incredible fillings. Think eggs, bacon, sausage, hamburger or chicken. It would be a fun spin on these yummy pancakes.
How to Store Pancakes
Storage: Potato pancakes will keep in the fridge for up to 1 week. If you can keep them single file. Cover tightly. These can also be frozen. Once they have cooled completely flash freeze on a sheet pan loosely covered with plastic wrap for about 3 hours. Remove and place in a freezer safe container or freezer bag. They can be kept for up to 3 months.
Reheat: Thaw overnight or on the counter the same day you’ll be using them. Place them on a sheet pan and crisp and warm them in a 350 degree oven for about 10-15 minutes. As always these taste best fresh from the pan!
More Potato Recipes
Potatoes are one of the best comfort foods. Rich in nutrition and so versatile, potatoes are absolutely scrumptious. They can be baked, mashed, boiled, grilled and fried. Add them to soups, casseroles, side dishes and appetizers. Potato starch is used in breads to make them moist and flavorful, and can even be used in desserts with success. Potatoes come in all sorts of colors and varieties. They can be the main attraction on the table or nice side, either way they should grace our tables regularly. Here are a few favorites to try!
Add back to processor with eggs, flour, salt and pepper until combined.
Heat a skillet to medium high heat with about 2-3 tablespoons of oil. Drop ¼ cup of the pancakes into the hot oil. Fry for 2-3 minutes on each side or until golden brown.