7-UP Biscuits

These 7 UP biscuits are tender and flakey layers of soft baked bread that melts in your mouth with every bite. These biscuits won’t last long at your dinner table!

If you are loving biscuits try this homemade biscuits and gravy recipe with these 7 UP biscuits recipe. These buttermilk biscuits are also another great biscuit recipe that are simple to make.

7 up biscuits stacked on a wooden plate.

7-UP Biscuits

These will be the best biscuits you will ever make. I wanted to try this recipe because it sounded weird. 7-UP in biscuits? But they are so good! They are soft and buttery and they didn’t even make it to the table before they were gone!

What are 7-Up biscuits?

These are the type of biscuits that seem to just melt in your mouth. This taste is so delicious and easily achieved with this recipe. These biscuits are just the perfect amount of butter and softness that compliment so many dishes. 

What do you need to make 7-Up biscuits?

The 7-Up biscuits are perfect for your weekly meals because they are simple enough to whip up at a moment’s notice. Only dilemma is they seem to disappear just as quickly as they are made! 

Good thing these require your basic ingredients that are not too hard to get a hold of. 

  • 2 cups Bisquick- can not forget the main ingredient that gives these biscuits life
  • 1/2 cup sour creamhelps create that fluffy texture that melts in your mouth
  • 1/2 cup 7-uphelps create a very soft dough that can rise easily 
  • 1/4 cup melted butterprovides that buttery sensation that we all love

How do you make 7-Up biscuits?

This is by far one of the most straightforward recipes you can find. It is perfect for pairing with meals at the last minute if you are needing an extra side because it is simple, quick to make, and worth every bite!

  1. Preheat the oven to 450.
  2. Cut sour cream into biscuit mix, add 7-Up. Makes a very soft dough.
  3. Sprinkle additional biscuit mix on board or table and pat dough out. Melt 1/4 cup butter in a 9 inch square pan. Place cut biscuits in the pan and bake for 12-15 minutes or until golden brown.
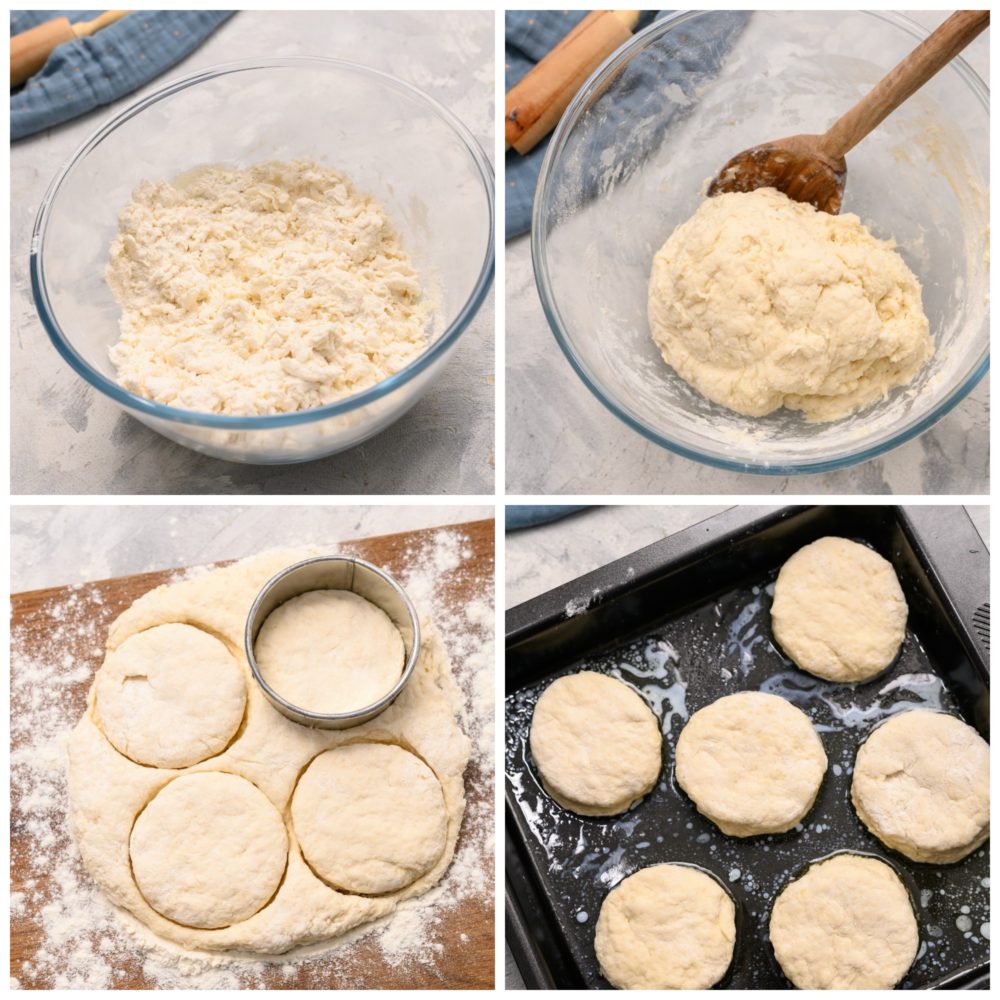
The process of making 7 Up biscuits in a glass bowl, cutting out the circular then placed on a pan ready to bake.


What do 7-Up Biscuits Pair Well With:

When it comes to bread and rolls, they can honestly go with just about anything. They are versatile enough to be a great filler for almost all of your meals. And with these 7-Up biscuits, you will WANT them to be at all of your meals.

Popular dishes you normally see bread paired with would be pastas, casseroles, seafood and meat dishes and so much more. A couple of my favorite recipes that go well when served with 7-Up biscuits would have to be Slow Cooker Beef Bourguignon, this is a warm beef stew that pairs perfectly with biscuits that just melt in your mouth. There is also Slow Cooker Tortellini Soup that is complete with 7-Up biscuits. Stews and soups are definitely great meals to pair with this recipe because there is nothing better than having a warm meal with bread to boot! 

Can you Make 7-Up biscuits ahead and store them

Absolutely. If you are trying to plan ahead or know that you’ll have minimal time when it comes to your meal you are able to make these biscuits beforehand. The tricky part may be storing or packaging them correctly because you do not want them to get stale. Here are a couple of tips and reminders when it comes to storing these biscuits.

  • Make sure to let biscuits cool on a wire rack for 30 minutes before storing
  • Once cooled, store biscuits in an airtight container, resealable bags work as well just make sure to squeeze out as much as possible when sealing them.
  • You can refrigerate biscuits with perishable items up to 1 week
  • If you are just keeping them at room temperature they can be stored for 1-2 days
  • If you decide to freeze them, wrap tightly in heavy duty aluminum foil or freeze wrap  to prevent biscuits from drying out or losing flavor
  • Properly wrapped biscuits that are frozen can last up to 2-3 months.

7 up biscuits baked on a pan.

How Do you Reheat Frozen Biscuits?

Frozen biscuits are an easy solution when you are trying to plan meals out ahead or are delivering meals to those in need. Just because they were frozen does not mean they need to lose their fresh out of the oven taste. Here are steps to follow when it comes time to reheat your biscuits.

  • Start by preheating the oven to 350 degrees Fahrenheit
  • Next, line a baking sheet with parchment paper and arrange the biscuits on top
  • Then bake the biscuits until they are hot, normally this will take about 12-15 minutes.
  • Top the biscuits with butter.
  • Serve and enjoy!

You can also choose to add honey, jam, or any other spread you like on your bread as well. These biscuits go with just about anything. 

Can you Make 7-Up Biscuits Without Bisquick:

Say it is later in the evening you have your main dish all put together and it is almost done cooking and you realize that biscuits would go perfectly with it. You have this recipe all ready to go and then see that you are all out of Bisquick. Not a problem! There is a simple substitution you can do so that you can still make delicious 7-Up biscuits. 

All you need is :

  • 6 cups all-purpose flour
  • 3 tablespoons of baking powder
  • 1 tablespoon of salt
  • 1 cup of vegetable shortening, cubed

This will make a total of 7 cups of Bisquick, so plenty to use if you need to make multiple batches!   

7 up biscuits stacked on top of each other with flour on a wooden spoon and butter on a wooden plate.

Try More Bread Sides:

Print

7 UP Biscuits

These 7 UP biscuits are tender and flakey layers of soft baked bread that melts in your mouth with every bite. These biscuits won't last long at your dinner table! 
Course Bread, Side Dish
Cuisine American
Keyword 7 up biscuits, biscuits, biscuits recipe
Prep Time 10 minutes
Cook Time 15 minutes
Total Time 25 minutes
Servings 9 Biscuits
Calories 189kcal
Author Alyssa Rivers

Ingredients

  • 2 cups Bisquick
  • 1/2 cup sour cream
  • 1/2 cup 7-up
  • 1/4 cup melted butter

Instructions

  • Preheat oven to 450.
  • Cut sour cream into biscuit mix, add 7-Up. Makes a very soft dough.
  • Sprinkle additional biscuit mix on board or table and pat dough out. Melt 1/4 cup butter in a 9 inch square pan. Place cut biscuits in pan and bake for 12-15 minutes or until golden brown.

Notes

Updated on March 31, 2020
Originally Posted on August 2, 2012

Nutrition

Calories: 189kcal | Carbohydrates: 19g | Protein: 2g | Fat: 12g | Saturated Fat: 6g | Cholesterol: 21mg | Sodium: 397mg | Potassium: 61mg | Fiber: 1g | Sugar: 5g | Vitamin A: 237IU | Vitamin C: 1mg | Calcium: 63mg | Iron: 1mg


source https://therecipecritic.com/7-up-biscuits/
Share:

ادرک کے حیرت انگیز طبی فوائد

درک ایک سبزی ہے اور اس کو مختلف سبزیوں ، دالوں اور گوشت کے پکوانوں میں ڈالا جاتا ہے تاکہ اس کا بہترین مصالحہ تیار ہو اور کھانے لذیذ بنیں ۔ خاص طور پر ایسی سبزیوں میں اس کا ڈالنا ضرور ہوتا ہے جو بادی ہوں جیسے آلو یاگوبھی وغیرہ ۔ یہ سبزی کھانوں میں لذت پیدا کرنے کے علاوہ مختلف بیماریوں میں بھی مفید ہے ۔ یہ تازہ ہی استعمال میں لائی جاتی ہے اگر اس کو خشک کرلیا جائے تو یہ سونٹھ بن جاتی ہے اور اسی نام سے مارکیٹ میں فروخت بھی ہوتی ہے ۔ اس میں وٹامن سی کی مقدار بھی موجود ہوت ہے اور تاثیر کے لحاظ 
                                      
  ادرک کے طبی فوائد  


۱۔ ادرک کھانوں کو ہضم کرنے میں مدد کرتی ہے ۔ ہر کھانے کے بعد ایک چھوٹا ٹکڑا کھالیا کریں ۔
۲۔ بلغم جاری کرتی ہے ۔
۳۔ جگر کو تقویت دیتی ہے ۔
۴۔ جسمانی دردوں کے لئے ذریعہ نجات ہے ۔
۵۔ معدے اور انتڑیوں کے جملہ امراض میں فائد ہ مند ہے، جن میں خاص طور پر انتڑیوں کی سوزش ہے ۔
۶۔دماغی امراض میں مفید ہے ۔
۷۔ ایسے خواتین و حضرات جن کو بھوک نہ لگتی ہووہ ادرک کا استعمال کریں کیونکہ ادرک بھوگ لگاتی ہے ۔
۸۔ سردیوں میں اگر کھانسی ہوجائے تو ادرک کے رس کو شہد میں ملا کرلیں ، آرام آئے گا۔
۹۔ ادرک گردوں اور مثانے میں طاقت پیدا کرتی ہے ۔
۱۰۔ متلی ، قے اور بدہضمی کیلئے فائدہ مند ہے ۔
۱۱۔ یرقان اور بواسیر کے لئے اس کا استعمال مفید ہے ۔
۱۲۔ اس میں شامل میگنیشیم اور زنک ہمارے خون کے سرکولیشن کونارمل رکھتا ہے ، اس لئے سردرد میں مددگار ہے ۔
۱۳۔نزلہ ، زکام اور بخار میں اس کی یخنی بنا کر پی لیں یا اس کا رس چائے میں شامل کرکے لے لیں ۔
۱۴۔ادرک کینسر کے بڑھنے کی رفتار کو کم کرتی ہے ۔
۱۵۔ گھبراہٹ اور بے چینی جیسے مسائل میں بھی ادرک مفید ہے ۔
۱۶۔ کمر کے نچلے حصے میں اگر درد ہو تو اس سے افاقہ ہو جاتا ہے ۔
۱۷۔ عورتوں کے مخصوص ایام میں دردوں کو کم کرنے میں مفید ہے ۔
۱۸۔ ادرک خون میں شکر کی سطح کو کنٹرول میں رکھتا ہے اور اس کو بڑھنے نہیں دیتا اس لئے شوگر کے مریضوں کے لئے ادر بہت مفید شے ہے سے گرم خشک ہے
Share:

Easy Tiramisu Recipe

Tiramisu is a popular no-bake Italian dessert meant to feed a crowd. Ladyfinger cookies are dipped in coffee then layered with a sweetened mascarpone cheese filling. The final touch is a sprinkling of cocoa powder on top.

Looking for more easy desserts? Then try this Edible Cookie Dough, Peanut Butter Cookies, or Rice Pudding

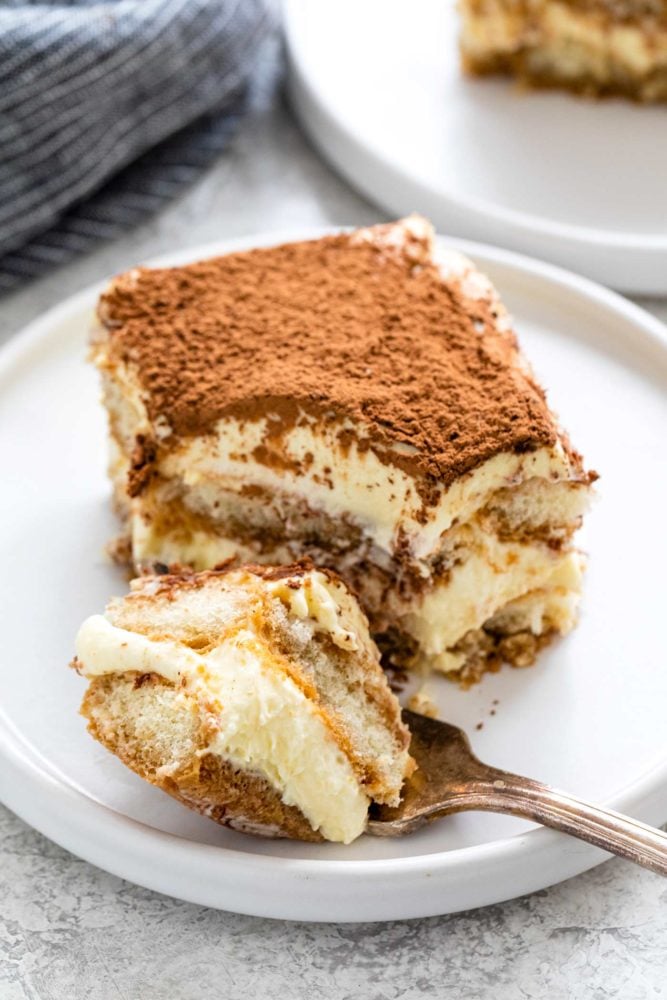
Slice of tiramisu on a plate with a spoonful taken out

Tiramisu

Tiramisu is a classic Italian dessert that has a sweet pick me up! Crispy ladyfinger cookies are individually dipped in a mixture of coffee and rum to make the cake-like base. A light and sweetened mascarpone cheese mixture is added in between the ladyfinger layers. A generous dusting on top with cocoa powder adds a stunning surface. It’s an easy dessert to make a day or two in advance that’s kept in the refrigerator.

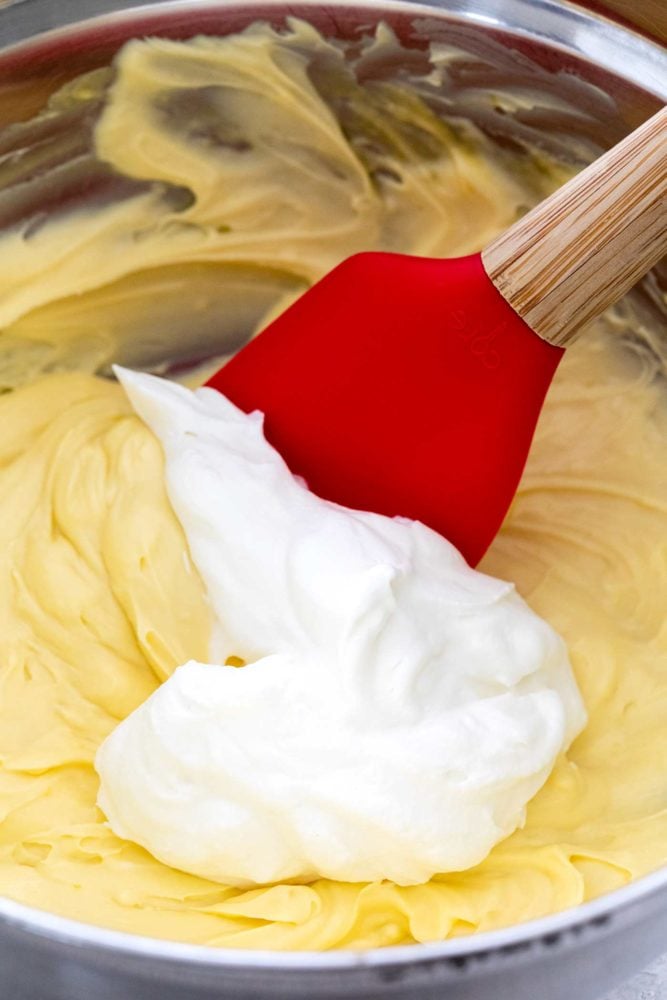
Spatula mixing eggs with cream in a bowl

How do you make tiramisu?

  • Cook the egg yolks, sugar, rum, and vanilla over a water bath until thickened.
  • Gently combine egg mixture with mascarpone cheese, and then whipped cream.
  • Quickly dip the ladyfingers in the coffee and rum mixture. Layer enough to fit in an 8 by 8-inch baking dish.
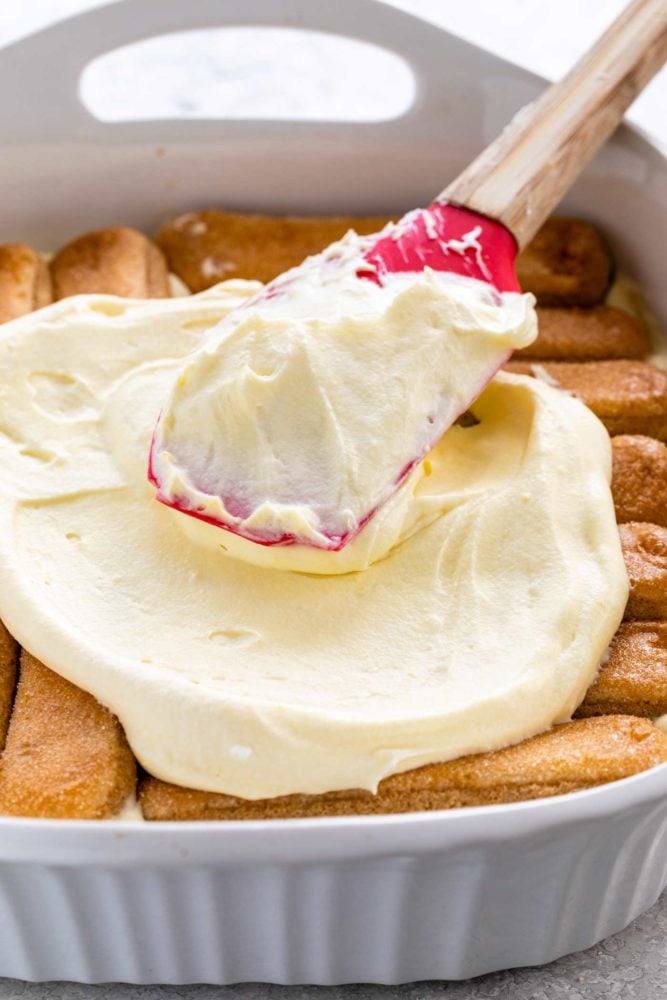
  • Spread half of the cheese mixture over the ladyfingers.
  • Make another layer of coffee dipped ladyfingers.
  • Spread the rest of the cheese mixture on top.
  • Generously dust the tiramisu with cocoa powder.

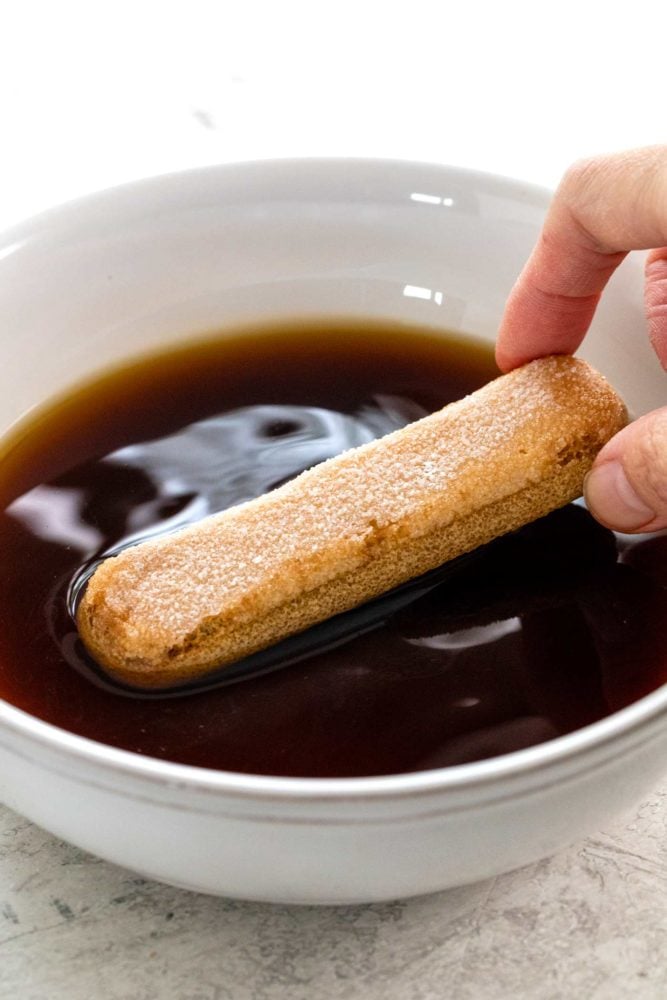
soaking a ladyfinger cookie in a bowl of coffee

What kind of coffee can be used?

Any type of strong coffee works well or freshly brewed espresso. I’ve also used cold brew coffee which makes a really convenient ingredient since you don’t have to let it cool down. Make sure to use cold or room temperature liquid, otherwise, the cookies will get mushy when dipping.

What types of cookies are used?

Ladyfingers are used for tiramisu. They are very light and crispy, they snap when broken in half because they are very dry. When dipped in liquid they quickly absorb it. Make sure to dip each side no longer than a few seconds. The texture turns moister and cake-like after it sits for several hours.

spreading filling mixture on ladyfingers sitting in a baking dish

Do you have to use alcohol?

No, it’s completely up to you if you want to omit it from the recipe. It will still be delicious, and have a wonderful strong coffee taste. Other alcohol options are Grand Marnier, brandy, any coffee liquor, or marsala wine.

How long do you have to wait to serve?

Wait at least 8 hours before serving the desert. Make it in the morning for dessert later in the evening, or it holds up very well for up to 2 days in the refrigerator. Let it sit at room temperature for at least 20 minutes so the cheese filling slightly softens. The texture will be more smooth and creamy.

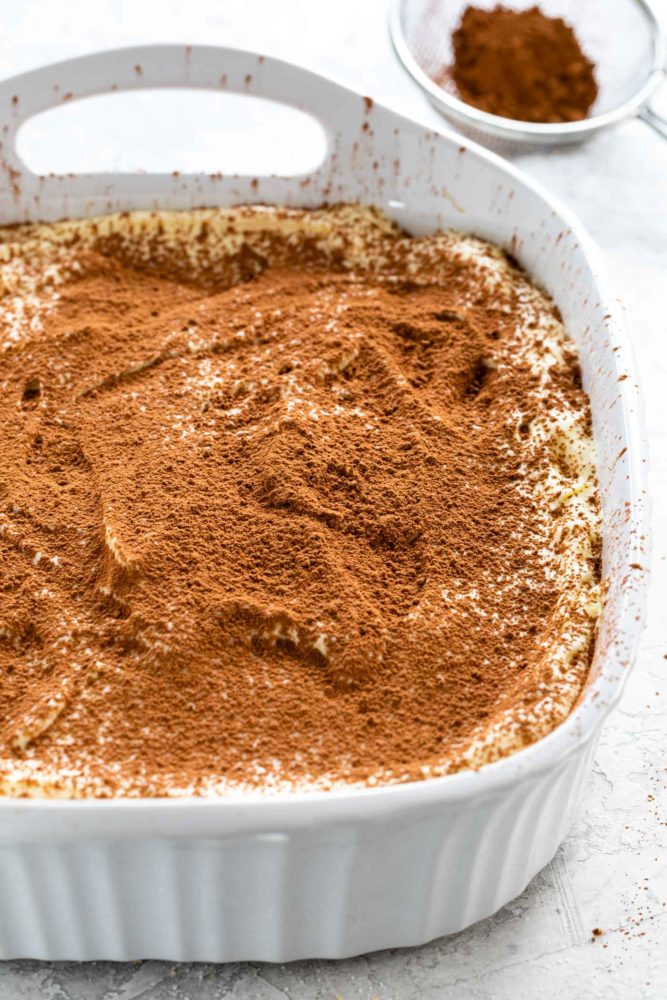
sprinkling cocoa powder over tiramisu

Looking for more no bake dessert ideas? Try these!

Print

Tiramisu

Tiramisu is a popular no-bake Italian dessert meant to feed a crowd. Ladyfinger cookies are dipped in coffee then layered with a sweetened mascarpone cheese filling.
Course Dessert
Cuisine Italian
Keyword how to make tiramisu
Prep Time 40 minutes
Cook Time 5 minutes
Total Time 45 minutes
Servings 9 servings
Calories 371kcal

Ingredients

  • 1 cup strong coffee or espresso at room temperature
  • ¼ cup dark rum divided
  • 3 large egg yolks
  • ½ cup granulated sugar divided
  • 1 teaspoon vanilla extract
  • 8 ounces 1 cup mascarpone cheese, chilled
  • ¾ cup heavy cream
  • 24 ladyfinger cookies 7-ounce package
  • 2 tablespoons cocoa powder for dusting

Instructions

  • In a shallow bowl combine coffee and 2 tablespoons rum.
  • Add egg yolks, 2 tablespoons rum, ¼ cup of sugar, and vanilla into a medium heatproof bowl.
  • Set the bowl on top of a saucepan filled with about 1-inch of water. Bring the water to barely a simmer, making sure that the bottom of the bowl does not touch the water.
  • Vigorously whisk the egg mixture until it is light and foamy, and about triples in volume, about 5 minutes.
  • Add mascarpone cheese to the egg mixture and whisk until the mixture is smooth.
  • In a separate bowl, whisk the heavy cream and ¼ cup sugar on medium speed until medium peaks form.
  • Gently fold ⅓ of the whipped cream mixture into the mascarpone mixture. Add the remaining whipped cream, and fold until just combined.
  • Quickly dip enough ladyfingers, about 2 seconds per side, to cover the bottom of an 8-inch square dish. Feel free to arrange the cookies anyways that they best fit in the dish.
  • Add half of the mascarpone mixture to the dish and evenly spread over the dipped ladyfingers.
  • Dip the remaining ladyfingers in the coffee, arrange on top of the cheese mixture.
  • Spread the remaining mascarpone cheese over the ladyfingers in an even layer.
  • Sprinkle some of the cocoa powder evenly over the tiramisu. Clean the edges of the dish. Cover with foil and refrigerate for at least 8 hours or up to 2 days.
  • Allow tiramisu to sit at room temperature for 20 minutes before cutting. Sprinkle with more cocoa powder right before serving.

Nutrition

Calories: 371kcal | Carbohydrates: 31g | Protein: 6g | Fat: 23g | Saturated Fat: 13g | Cholesterol: 182mg | Sodium: 68mg | Potassium: 84mg | Fiber: 1g | Sugar: 11g | Vitamin A: 894IU | Vitamin C: 1mg | Calcium: 71mg | Iron: 1mg


source https://therecipecritic.com/easy-tiramisu-recipe/
Share:

Bringing Georgia O’Keeffe To Life, One Recipe At A Time

The painter's recipes go up for auction... Sotheby’s is about to put a trove of Georgia O'Keeffe items up for sale. While the auction will include paintings likely to go for millions of dollars, we're interested in something less valuable, but to us, way more exciting — O'Keeffe's box of grease-stained, handwritten recipes. This week Dan goes to see the recipes himself and talks with art experts, O’Keeffe scholars, and a woman who cooked for O'Keeffe towards the end of her life to find out what the recipes say about the artist. As for the auction? Well, it doesn't go exactly as planned.

Get 500+ more great Sporkful episodes from our catalog and lots of other Stitcher goodness when you sign up for Stitcher Premium: www.StitcherPremium.com/Sporkful (promo code: SPORKFUL).

Transcript available at www.sporkful.com.


Share:

8 Can Chicken Taco Soup

Only 8 cans needed to make the MOST delicious chicken taco soup. It is just what you need to make a simple weeknight meal that the whole family will love!

Taco soup is full of flavor and a tried and true favorite! Make this in a variety of ways with my crockpot taco soup, easy cheesy taco soup or skinny taco soup.

Two bowls of chicken taco soup garnished with sliced olives, limes and a dollop of sour cream.

8 Can Chicken Taco Soup

I love how easy this recipe is and that I have these 8 cans on hand at any given time. Add it all together and create one amazingly easy dish that is thrown into a stove top pot or slow cooker. As the taco soup is cooking the flavors begin to combines creating an irresistible soup. It is thick, rich and chunky! This taco soup is fresh and comforting in every bite!

On a day your family needs you, this chicken taco soup recipe is there for you. All the flavors and warmth it brings in each bowl will bring everyone comfort and love gathered around the table. My family loves these fresh ingredients and sees how easy it is to make. This is a weekly soup that we all love and find it as a family favorite. Keeping these simple ingredients in the pantry makes it even easier to make when you need it most. Add toppings on top and have a complete meal with the whole family!

Chicken Taco Soup Ingredients:

Each ingredient is one that you can have already in the pantry. It is simple to make and a tried and true favorite chicken taco soup. Only 8 cans to open, drain and dump into the pot. It is that quick and easy to make! I love all the smells this soup brings into my kitchen and how fresh it tastes after a few minutes of boiling. This recipe is one to make over and over again!

  • Tomatoes: Diced in a can and add it in the soup.
  • Corn: Drain the corn and add to the pot.
  • Black Beans: First drain and rinse the beans well to make sure the salt is washed off.
  • Pinto Beans: Adds the extra thickness that are creamy.
  • Cream of Chicken Soup: Thick soup mixed with small chicken bites. All ready to be added to the soup once opened.
  • Chicken Breast: Tender chicken in a can that is ready in minutes. Drain and add it in!
  • Green Enchiladas Sauce: Bring on some spice with this enchilada sauce.
  • Chicken Broth: A savory liquid that fills this soup with chicken flavoring.
  • Homemade Taco Seasoning: My homemade taco seasoning is so good and easy to make. Make ahead of time and store for 3 months!

Optional Toppings: 

  • Olives: Sliced
  • Avocado: Diced
  • Sour Cream: a dollop on top
  • Tortilla Strips: A crunch that brings texture to the soup.
  • Lime Wedges: Light and refreshing squeeze of lime tastes delicious!

How to Make Chicken Taco Soup:

Try this chicken taco soup with 8 cans and taco seasoning to make one AMAZINGLY delicious soup.  All the flavor you know and love with the comfort of family around your dinner table. Smell all the cans blend together in less than 30 minutes!

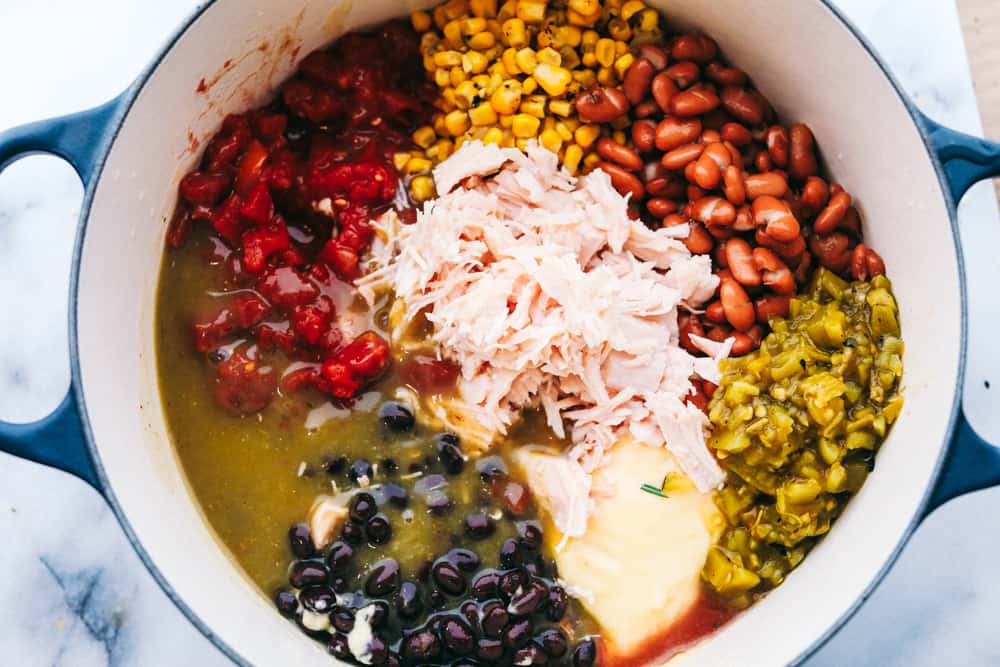
  1. Add all the ingredients: In a large pot add the diced tomatoes, corn, black beans, pinto beans, cream of chicken, chicken breast, green enchilada sauce, chicken broth, and homemade taco seasoning. 
  2. Cook taco soup: Bring to a boil and reduce to a simmer over medium heat.  Let simmer for 5 minutes and serve with desired toppings.

All the cans of beans, corn, chicken and enchilada sauce in the pot with cream of chicken soup and chicken broth.

How to Make Taco Soup in a Slow Cooker:

Two ways to make this delicious taco soup recipe. On the stove top or in a slow cooker. Make it even easier having the slow cooker do all that work. Simply add all the ingredients into the slow cooker and stir together. Cook on low heat for 2 to 3 hours or until warmed through. Serve with all your favorite taco soup toppings!

Favorite Taco Soup Toppings:

Add all your favorite taco soup toppings and customize your meal just the way you like it. Mix it up or keep it plain! These variations are a fun way to enjoy your taco soup recipe.

  • Guacamole
  • Chopped cilantro
  • Salsa
  • Plain greek yogurt
  • Rice
  • Shredded Mexican blend cheese
  • Diced green or white onions
  • Jalapeños

All 8 cans of ingredients in the taco chicken soup cooking in a pot with a ladle showing the ingredients cooking together.

More of my Favorite Mexican Dishes:

A bowl of 8 can chicken taco soup garnished with lime wedges, sour cream, sliced olives, avocado and tortilla strips.

Print

8 Can Chicken Taco Soup

Only 8 cans to make the MOST delicious chicken taco soup is just what you need to make a simple weeknight meal that the whole family will love! A tried and true favorite soup! 
Course Dinner, Main Course
Cuisine Mexican
Keyword 8 can chicken taco soup, 8 can taco soup, chicken taco soup, Crockpot Taco Soup, taco soup, taco soup recipe
Prep Time 10 minutes
Cook Time 20 minutes
Total Time 30 minutes
Servings 8 People
Calories 184kcal
Author Alyssa Rivers

Ingredients

  • 1 can Tomatoes, diced 15 ounces
  • 1 can Corn, drained 15 ounces
  • 1 can Black Beans, rinsed 15 ounces
  • 1 can Pinto Beans, rinsed 15 ounces
  • 1 can Cream of Chicken Soup 10 3/4 ounce
  • 1 can Chicken Breast, drained 12 ounces
  • 1 can Green Enchilada Sauce 10 ounces
  • 1 can Chicken Broth 15 ounces
  • Homemade Taco Seasoning

Optional Toppings:

  • Olives sliced
  • Avocado diced
  • Sour Cream
  • Tortilla Strips
  • Limes Wedges

Instructions

  • In a large pot add the diced tomatoes, corn, black beans, pinto beans, cream of chicken, chicken breast, green enchilada sauce, chicken broth, and homemade taco seasoning.
  • Bring to a boil and reduce to a simmer over medium heat. Let simmer for 5 minutes and serve with desired toppings.

Nutrition

Calories: 184kcal | Carbohydrates: 32g | Protein: 9g | Fat: 3g | Saturated Fat: 1g | Cholesterol: 3mg | Sodium: 621mg | Potassium: 537mg | Fiber: 8g | Sugar: 4g | Vitamin A: 264IU | Vitamin C: 9mg | Calcium: 66mg | Iron: 3mg


source https://therecipecritic.com/chicken-taco-soup/
Share:

Breakfast Burritos that are Freezer Friendly!

Breakfast burritos stacked on top of each other

Breakfast Burritos are a great way to plan breakfast ahead. These are packed with ham, eggs, cheese and a lot of add-ins like pico de gallo, hash browns etc.

Also check out our favorite breakfast recipes like sausage mushroom frittata, cinnamon roll pancakes, yogurt parfait and denver omelet casserole.

Breakfast burritos stacked on top of each other

If you are not a breakfast person, you’ll love breakfast after you try these breakfast burritos! They are incredibly easy to make, you can make a big batch and freeze them ahead. So if you have a large family that needs to be fed, you don’t need to spend mornings making breakfast anymore. Just prep them over the weekend, and you have breakfast ready during the week. Plus, I’m going to give you a ton of ideas on how you can make them a little bit different.

Freezer Friendly Breakfast Burritos

We love breakfast burritos because you can so easily make them your own. And they are a great way to break up the monotony of having eggs or cereal every day.

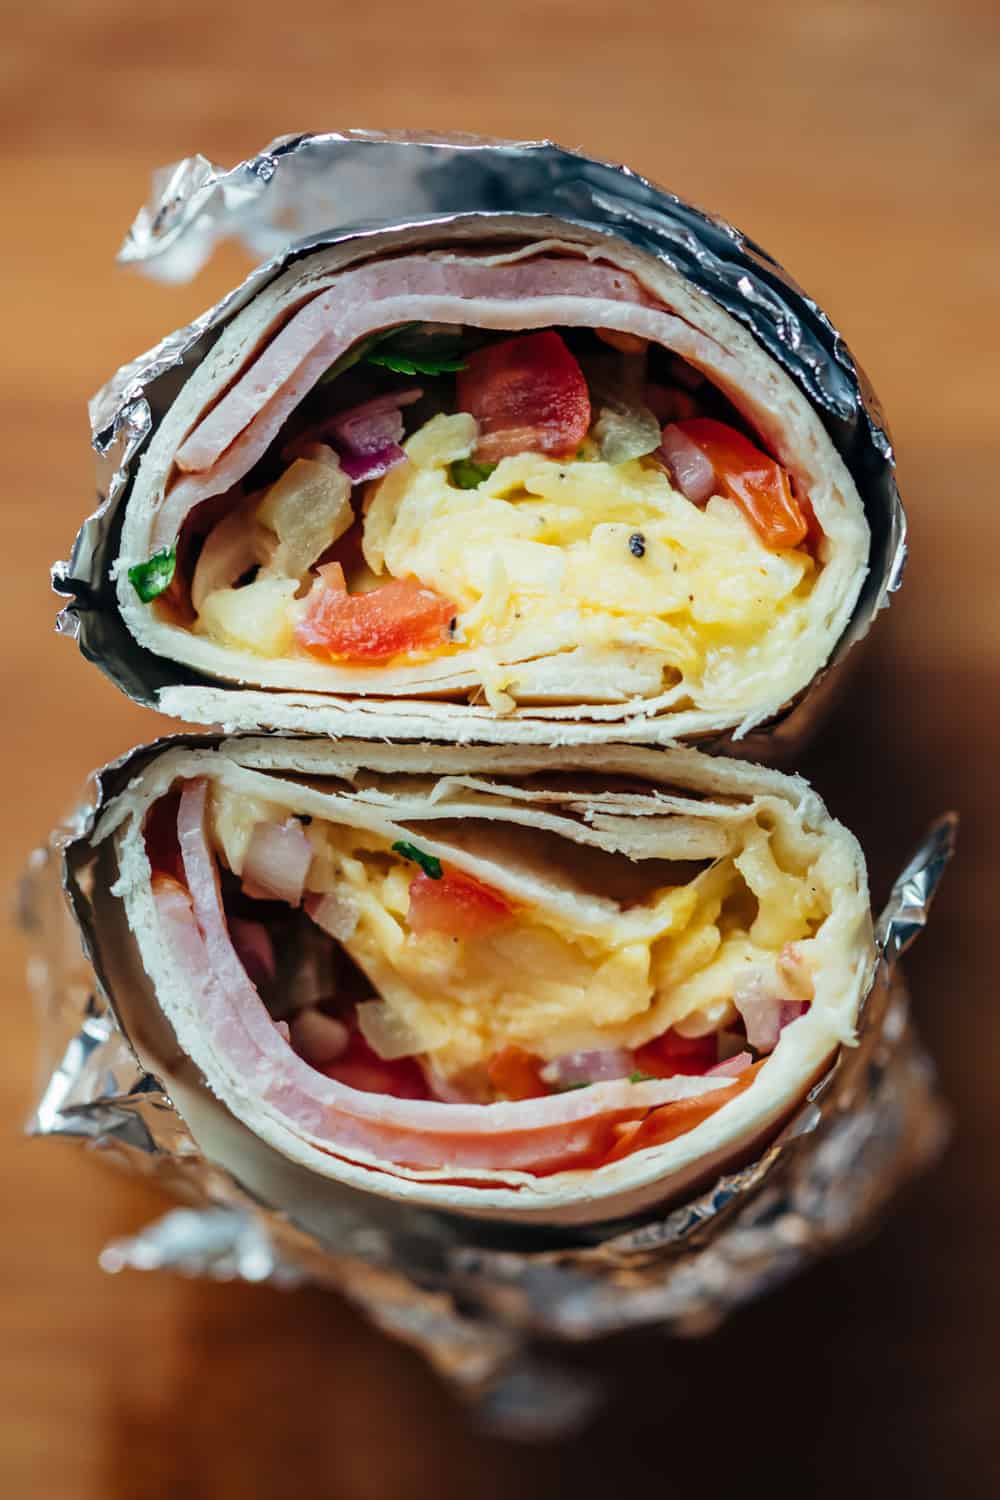
I make these breakfast burritos a ton of different ways. The ones pictures here are filled with turkey ham, scrambled eggs, pico de gallo and lots of melty cheese.

Let’s talk about all the different things that can make these burritos even more awesome.

Scrambled eggs in a pan

Storing and using Tortillas

We like using 8 inch flour tortillas, but you can also use a larger size if you prefer. Try to open a fresh batch of tortillas and use them for these burritos because they are the easiest to roll. But if you have slightly oder tortillas, stack them between slightly damp towels and microwave them for 20-30 seconds and they’ll come right back to life!

Filling inside a breakfast burrito

Filling Ideas

We love using slices of ham as the first thing on these tortillas. It keeps the tortilla from getting wet and acts like a barrier between the rest of the filling and the tortillas. Other filling ideas include:

  • scrambled eggs
  • onions and mushroom
  • bacon
  • tomatoes
  • spicy sausages
  • chopped bell peppers
  • hash brown potatoes
  • black beans
  • refried beans

And CHEESE of course!

Breakfast burritos packed in foil

Start by prepping and cooking everything. Then get the family together, and roll these breakfast burritos together. Kids can decide what they want or don’t want in their burritos. As you roll these out, you can wrap them in foil or parchment paper and write the ingredients on top so that you can easily identify whats in them. Then just transfer them to a gallon sized ziplock and freeze them, or consume them immediately. To reheat, unwrap them and microwave them for a minute or two till they are warm and the cheese has melted inside.

More Delicious Egg Recipes:

Breakfast burritos stacked on top of each other
Print

Breakfast Burritos

Easy breakfast burritos that are filled with scrambled eggs, ham, pico de gallo and lots of cheese. Freezer friendly and can be made ahead.
Course Breakfast
Cuisine Mexican
Keyword Breakfast Burritos
Prep Time 20 minutes
Cook Time 15 minutes
Servings 8 people
Calories 397kcal

Ingredients

  • 8 8 inch Flour Tortillas
  • 2 tablespoons Butter
  • 12 large Eggs
  • 1/4 cup Sour Cream
  • 1/2 teaspoon Salt
  • 1/2 teaspoon black Pepper
  • 8 slices Deli Ham
  • 1 1/2 cups Pico de Gallo
  • 1 1/2 cups grated Cheddar

Instructions

  • Whisk together eggs, sour cream, salt and pepper. Heat butter in a non stick skillet and add the whisked eggs. Stir the eggs and scramble till they are cooked (approx 2-3 minutes). Remove from the pan and set aside.
  • To assemble the tortillas, place a slice of deli ham on a flour tortilla. Add approx 1/2 cup scrambled eggs, 1-2 tbsp pico de gallo and sprinkle with cheese. Don't overstuff them or they will be difficult to roll.
  • Roll the burritos from bottom to top. Roll one end of the tortilla over the filling, fold the sides over and continue rolling till you reach the top, tucking the filling in as you go. Repeat till all the burritos are filled.

Notes

  • To make pico de gallo, mix together chopped tomatoes, onions, garlic, jalapenos, lime juice, chopped cilantro and salt.
  • Store these burritos by wrapping them in parchment paper or foil
  • If freezing these burritos for later, skip the pico de gallo, and replace it with sauteed mushrooms, hash browns or sausage

Nutrition

Calories: 397kcal | Carbohydrates: 22g | Protein: 22g | Fat: 24g | Saturated Fat: 11g | Cholesterol: 296mg | Sodium: 1239mg | Potassium: 248mg | Fiber: 1g | Sugar: 6g | Vitamin A: 900IU | Vitamin C: 2mg | Calcium: 231mg | Iron: 3mg


source https://therecipecritic.com/breakfast-burritos/
Share:

Popular

Slider Tag

Facebook

Header Ads

Recent in Food

Recent Posts

Unordered List

  • Lorem ipsum dolor sit amet, consectetuer adipiscing elit.
  • Aliquam tincidunt mauris eu risus.
  • Vestibulum auctor dapibus neque.

Pages

Theme Support

Need our help to upload or customize this blogger template? Contact me with details about the theme customization you need.