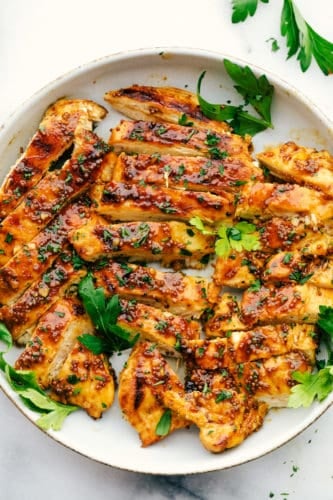

Grilled Honey Mustard Chicken
Wow! I’m a little obsessed with this grilled honey mustard chicken recipe. You MUST try it this summer!! I know it is a 5 star recipe when I already want to make it again next week. I have tried recipes before with honey dijon but this honey dijon sauce has such amazing spices in it that it stands out from any other mixture I have seen! When everything is combined the sauce is perfect with a tiny but of a kick to it.
The grilled honey mustard is something even the pickiest eater at my house enjoys because of the sweet honey flavor. Then, after a long day of being outside my hubby’s friends came over and they were happily eating our leftovers! Yeah, it’s that good! I was a little sad not to have leftovers to store. So, next time I will definitely have to double the recipe! I served it with my parmesan asparagus and made a strawberry cheesecake salad! Delish!
Honey Mustard Chicken Ingredients:
- Whole grain mustard: Sometimes difficult to find, so coarse-ground mustard or stone-ground mustard work well too.
- Honey: The thick, sweetness is the perfect balance to the other flavors.
- Lemon: The hint of fresh tangy lemon is that surprising flavor that makes this chicken stand out!
- Garlic:A clove smashed and minced.
- Paprika: Adds great color.
- Salt: The salt will bring out the flavors of the spices.
- Cayenne pepper: Adds a great medium level spice to the sauce.
- Red pepper flakes: Even more heat comes from this mix of crushed peppers.
- Chicken: I like to use boneless, skinless breasts with this recipe.
How to Grill Chicken:
- Whisk all ingredients Using a small bowl, mix all ingredients together.
- Split sauce: Reserve 4 tablespoons of sauce and then pour the remaining honey mustard mixture over the chicken. Cover with plastic wrap and let it sit for about 30-45 minutes at room temperature.
- Grill Chicken: Preheat the grill on medium-medium high heat, grill chicken for about 6 to 7 minutes per side or until chicken is done.
- Dress and Serve: Pour the reserved honey-mustard sauce over chicken and let rest under foil for about 5 minutes. Serve.

Tips for Grilling:
- If your chicken breasts are really thick, pound them to thin them out. It will reduce cooking time and help it to cook more evenly.
- Boneless breasts (or thighs) make the best grilling chicken since they are lean and quick to make.
- Serve grilled honey mustard chicken over rice, a salad or with your favorite summer vegetables!
- Make sure your grill is clean before you begin and rub some oil on the grates to prevent the chicken from sticking.
- You are aiming for a medium, indirect heat while grilling so that the outside of the chicken does not burn while you get the inside up to temperature.
- Keep the grill closed while cooking. This will keep the heat in and allow the chicken to cook quicker and more evenly.
The Perfect Temperature:
When the chicken reaches 165º F, it is done. The juice will run clear once the chicken is done, but to be sure you can use a meat thermometer to confirm it is cooked thoroughly. I personally love the Thermapen. It reads the temperature so fast and has lasted so well over time. ThermoPop is another brand I have heard good reviews about as well.
- Thinly sliced chicken breasts won’t take as long to reach temperature.
- Basic rule is 3-5 minutes per side on medium to high heat, but will vary depending on the thickness of your meat.
- The chicken will continue to cook slightly even after removed from the grill.

Storing Grilled Chicken:
I don’t know about you, but I am always wondering how long my leftovers are good once stored. Especially with chicken. So, I have done my research to be sure. Here is what I know:
- Allow to cool after cooking no more than 2 hours.
- Store in a shallow airtight container.
- Grilled honey mustard chicken will be good in the refrigerator for 3-4 days or in the freezer for 4 months.
- To avoid freezer burn be sure to pack your chicken tightly with airtight heavy-duty foil, plastic wrap or freezer paper or putting it in a freezer bag.

BBQ All Summer with these Popular Grilling Recipes:
- Grilled Honey Balsamic Chicken
- Garlic Herb Flank Steak with Avocado Corn Salsa
- Perfectly Juicy Grilled Steak
- Grilled Hawaiian Teriyaki Chicken Skewers
- Awesome Grilled Salmon with Avocado Salsa

Grilled Honey Mustard Chicken
Ingredients
- 1/2 cup of any whole grain mustard
- 1/2 cup of honey
- Juice of 1/2 a lemon
- 1 garlic clove smashed and minced
- 1/2 teaspoon paprika
- 1/2 teaspoon salt
- 1/4 teaspoon cayenne pepper
- 1/4 teaspoon red pepper flakes
- 4 boneless skinless chicken breasts
Instructions
-
Preheat the grill on medium-medium high heat, grill chicken for about 6 to 7 minutes per side or until chicken is done.
-
Pour the reserved honey-mustard sauce over chicken and let rest under foil for about 5 minutes. Serve.
Notes
Nutrition
source https://therecipecritic.com/grilled-honey-mustard-chicken/