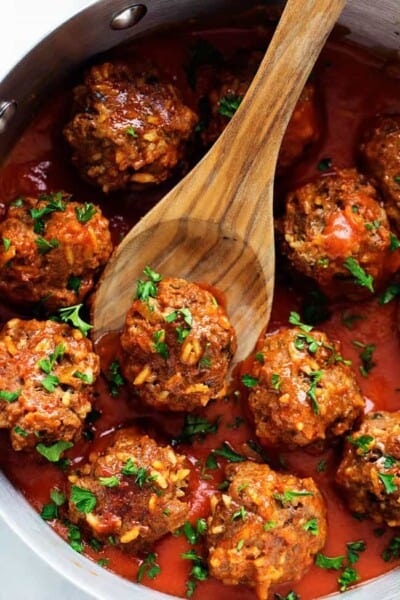
Porcupine Meatballs

Porcupine Meatballs are hearty and well-seasoned meatballs with rice that simmer in a rich tomato sauce. This is a family recipe passed down from my grandma and I know that your family will love it too!

Another great way of making these famous porcupine meatballs is in the slow cooker recipe. Enjoy both ways depending on what is best for your family!

Porcupine Meatballs in a skillet garnished with chives.

Porcupine Meatballs

Oh porcupine meatballs. How I love you.

This was a recipe that my grandmother used to cook for my mom. My mom would make it for us all of the time and now I make it for my family! These kind of “tried and true” recipes that are passed down are the very best. So many memories come back to me when I make these for my family. I remember how excited we would all get when my mom was making porcupine meatballs for dinner. I loved to help her in the kitchen and make the little meatballs. As soon as they were done, they were devoured by our family in a matter of minutes.

I love using McCormick spices because they are such high quality and add such amazing flavor to your dish. McCormick has been around since 1889. I remember looking in my grandmothers cabinets and seeing the red caps in her cupboards. My mom uses them in her cooking and now I use them in mine. It is a company that I can stand behind and know and love.

Meatball Ingredients:

Now is the time to keep your cupboards stocked with all of your favorite McCormick spices. We are entering in the cozy comfort food season full of casseroles, soups, and slow cooker meals.

I am always using garlic powder, paprika, chili powder, and tons of cinnamon throughout the year. And McCormick has so many other amazing quality spices that I love to use as well.

  • Ground Beef: Ground Chuck is the best for meatballs
  • Long grain rice: This type of rice includes American long-grain white and brown rice, Basmati rice, and Jasmine rice, and produces distinct firm grains that stay fluffy
  • Egg: This will be the binding agent that holds everything in shape
  • Parsley: Adds balance to this savory dish and brightens the flavor
  • Onion: The onion gives the meatballs a cleaner taste
  • Garlic Powder: This powder has a slightly sweeter taste than fresh garlic
  • Paprika: Colorful Spice derived from ground peppers gives these meatballs their stand out flavor
  • Pepper: Add to taste
  • Salt – Adding salt to your food will enhance the other flavors
  • Condensed tomato soup: Using this in both the meatball and the sauce gives the tomato texture consistency
  • Water: Used to thin out the sauce
  • Worcestershire sauce: Made from a base of vinegar, which gives it a bit of a tangy flavor, this sauce adds both sweet and savory tastes to the sauce

How to Make Porcupine Meatballs:

These porcupine meatballs are well seasoned with McCormick spices to bring out amazing flavor. The rice in the meatball which give it the porcupine name add such a delicious texture. They simmer in a rich tomato sauce and cook to perfection.

These are some of the best little meatballs that you are going to eat. They are a family favorite of ours and I know that they will become a family favorite at your house as well!

  1. Combine ingredients: In a medium sized bowl combine meat, rice, egg, parsley, onion, garlic powder, paprika, pepper, salt and 1/4 cup tomato soup. Mix thoroughly and shape into about 20 meatballs and place in a skillet.
  2. Mix Sauce: Mix together remaining soup, water and Worcestershire sauce. Pour over meatballs.
  3. Bring to a boil: Once the sauce is bubbling reduce the heat. Cover and simmer for about 35-40 minutes stirring often.

Making homemade meatballs but adding all of the ingredients together and mixing it until well combined then rolling into 1 in balls and cooking on a skillet until cooked through then adding a sauce over top of the meatballs.

Variations:

This is the perfect recipe to sneak in some extra nutrition in for your kids (or your husband) by adding in or swapping out some ingredients.  It doesn’t take away from the flavor at all and no one will have any clue they are getting some extra vitamins or an extra lean meat.  Mix around the ingredients and try something new! You can’t mess up this tried and true favorite!

  • Cheese: Use some of your favorite shredded cheese for an extra ooey gooey texture and flavor.
  • Protein: Swap out the ground beef for ground chicken, pork, sausage, or turkey.
  • Vegetables: Chop up small pieces of mushroom, carrot, or zucchini or bell peppers to add into your meatball.

Porcupine Meatballs in a skillet cooking with a wooden spoon picking up a meatball.

What to Serve with Your Meatballs:

Make a complete meal with a simple side dish! To compliment these delicious meatballs I suggest trying mashed cauliflower or mashed potatoes. 

How to Store Dinner Time Porcupine Meatballs:

  • Make meatballs ahead of time: Keeping a stock of frozen meatballs on hand means you can easily prepare a quick satisfying meal for you family.  Busy weeknights, late practices, unexpected guests? No problem when you have these insanely delicious meatballs on hand.
  • Storing leftover meatballs: Wrap tightly in heavy duty aluminum foil or freezer wrap.  They will last 3-4 days in the refrigerator.
  • Can you freeze meatballs? Yes! Store in airtight freezer containers or heavy duty freezer bags. Properly stored they will be at their best quality for 2-3 months if cooked and 3-4 months if stored uncooked, but will remain safe beyond that if kept at 0 degrees.
  • Reheating meatballs: These meatballs can be re-heated easily from frozen or thawed.  To thaw meatballs, simply place in the refrigerator overnight.  Re-heat on a greased baking pan in the oven at 350 degrees until heated through.  Frozen meatballs will take 50% longer to re-heat.  Cook time is 20-25 minutes if cooking from frozen.

Porcupine Meatballs laying on a bed of rice garnished with chives and mccormick seasoning in the background.

More Meatball Recipes To Try:

Porcupine meatballs in a skillet with a wooden spoon.

This post was sponsored by McCormick®. I love working with brands that I am passionate about and use in the kitchen for myself. All opinions expressed are my own.

 

Print

Porcupine Meatballs

Hearty and well seasoned meatballs with rice that simmer in a rich tomato sauce.  This is a family recipe passed down from my grandma and I know that your family will love it too! 
Course Dinner, Main Course
Cuisine American
Keyword meatball recipe, meatballs, porcupine meatballs
Prep Time 10 minutes
Cook Time 35 minutes
Total Time 45 minutes
Servings 6 Servings
Calories 269kcal
Author Alyssa Rivers

Ingredients

  • 1 Pound Ground Beef
  • 1/4 cup long grain rice uncooked
  • 1 egg slightly beaten
  • 1 tablespoon parsley chopped
  • 1/4 cup onion finely chopped
  • 1/2 teaspoon McCormick® Garlic Powder
  • 1/4 teaspoon McCormick® paprika
  • 1/8 teaspoon McCormick® Pepper
  • 1/2 teaspoon salt
  • 1 can condensed tomato soup 10 3/4 oz, divided
  • 1/2 cup water
  • 2 teaspoons Worcestershire sauce

Instructions

  • In a medium sized bowl combine meat, rice, egg, parsley, onion, garlic powder, paprika, pepper, salt and 1/4 cup tomato soup. Mix thoroughly and shape into about 20 meatballs and place in a skillet.
  • Mix remaining soup, water and worchestershire sauce. Pour over meatballs. Bring to a boil and reduce heat. Cover and simmer for about 35-40 minutes stirring often.

Notes

Updated on April 3, 2020
Original Post on October 8, 2015

Nutrition

Calories: 269kcal | Carbohydrates: 15g | Protein: 15g | Fat: 16g | Saturated Fat: 6g | Cholesterol: 81mg | Sodium: 461mg | Potassium: 524mg | Fiber: 1g | Sugar: 5g | Vitamin A: 329IU | Vitamin C: 8mg | Calcium: 28mg | Iron: 2mg


source https://therecipecritic.com/porcupine-meatballs/
Share:

Weekly Menu Plan {Number 5}

This weekly menu plan is a weeks worth of good, comfort meals the whole family will love. Enjoy homemade meals with simple ingredients that are family friendly and tried and true favorites! 

Enjoy this weeks menu plan with my favorites like baked cod, Korean ground beef rice bowls and my very favorite cookie bar dessert, Carmelites. You can see all of the (weekly menu plans here).


Weekly menu plan photos in a collage with all the recipes.

Weekly Menu Plan {Number Five}

Number five weekly menu plan is all about comfort, pantry style ingredients and simple recipes to help make the busy week nights less stressful. Each recipe is tested by my family and loved by all. They are kid friendly and make for delicous homemade meals at home. 

Perfect your homemade meals with this easy to read grocery list and menu plan that will help get you through the week. No more worrying about meals each night and what to make. These recipe are ready for you and going to make life a little less stressful. 

8 can chicken taco soup with the weekly menu plan title.

8 Can Chicken Taco Soup Recipe

Only 8 cans needed to make the MOST delicious chicken taco soup. It is just what you need to make a simple weeknight meal that the whole family will love!

Korean ground beef weekly menu plan photo

Korean Ground Beef and Rice Bowls

Korean Ground Beef and Rice Bowls are so incredibly easy to make and will become a family favorite! This makes the perfect weeknight meal.

Baked cod weekly menu plan photo

Baked Cod

Baked Cajun Garlic Butter Cod is a tender and juicy cod filet baked in a buttery cajun seasoning with garlic cloves and olive oil making this cod a flavorful and delicious dinner. 

Thursday weekly menu plan photo of easy pasta primavera recipe.

Easy Pasta Primavera Recipe

Pasta Primavera is a classic Italian American recipe that’s loaded with spring vegetables. It has a light and fresh sauce and is the perfect break from heavier winter foods!

Saturday morning breakfast photo of breakfast burritos for the weekly menu plan.

Breakfast Burritos that are Freezer Friendly

Breakfast Burritos are a great way to plan breakfast ahead. These are packed with ham, eggs, cheese and a lot of add-ins like pico de gallo, hash browns etc.

Weekly menu plan photo for Sunday with crazy tender baked roast photo.

Crazy Tender Baked Roast

Fall apart juicy, tender roast with hardly any hands-on prep time is easy enough for everyday, delicious enough for company!

Dessert photo with Carmelitas stacked on top of each other.

Carmelitas Cookie Bar Recipe

Carmelitas are the best cookies known to man that are baked with caramel and chocolate in the middle of an oat cookie crust, these will change your life. This is known as the best cookie ever!

Printable Shopping List:

I made this as easy as possible by even providing a FREE shopping list that is easy to print and makes your grocery shopping days much easier.

I am excited to continue with these weekly menu plans! Plan five was so fun to put together and plan out pantry staple items that can all be made at home in less than an hour. Each recipe will smell the home with the perfect aroma making your mouth water each night for dinner. Breakfast is served on Saturday morning with a freezer meal kind of breakfast to have now and later for next week. Making things easy and less work is just what we all need right now! Enjoy these delicious dishes from my home to yours!

Click Here for the Grocery List Printable

Weekly menu plan grocery list to print off.

Click Here for the Grocery List Printable

Post Updated on April 2, 2020

Originally Posted on July 18, 2015


source https://therecipecritic.com/weekly-menu-plan-5/
Share:

Buttery Beer Bread

No yeast, No problem! This recipe is a light and fluffy buttery bread that is filled with a special ingredient that substitutes for yeast. You guessed it, beer! With this six ingredient recipe you will be sure to please your family with this homemade buttery beer bread recipe!

Forget about yeast for this recipe. But if you are one of the lucky ones that has found yeast here are a few of my favorite recipe like grandma’s perfect homemade bread recipe, focaccia bread recipe or this miracle no knead bread.

Buttery beer bread loaf in a photo.

Buttery Beer Bread

I am so excited to share this irresistible buttery beer bread with you! It is so easy to make and no need to have yeast. Yep! That’s the best part! Yeast is a hot item right now and I knew that we all needed some carbs at this point. Buttery beer bread is delicious and flavorful. Once you make your first loaf you will wonder why you haven’t made this yet. It is one of the best homemade bread ever!

Let me tell you, it is all pantry staple ingredients that is simple to mix together and bake all in one day. It is that fun and easy! Homemade bread is one of my very favorite things to eat. Pair it with your favorite soup, slow cooker meal or just enjoy it warm and fresh out of the oven. Enjoy it anyway you want it!

Beer can be a scary word for some people. I know we don’t drink it or promote it but with this combination it creates a homemade bread skipping the yeast. If you are not a beer fan in general you don’t have to worry about the taste either. There is no beer taste, no alcohol in the bread and no way to get a little tipsy with this bread recipe. It is family friendly, kid friendly and full of flavor without the beer taste. Give it a try and see how amazed you will be!

What is Beer Bread?

Beer bread is a quick and simple bread recipe that has a special flavoring added to it. Can you guess? It is a bottle of beer. I know I don’t encourage alcohol and don’t drink it myself but this bread recipe is all about it. The crazy part is, the beer actually bakes right out of the bread as it is baking at a high temperature.

Since there is a limit on yeast, this beer bread sounded perfect to me since there is no yeast in this bread. The beer is acting in place of the yeast for this bread recipe. With the help of baking powder this combination creates one amazingly delicious bread that is over the top delicious. Don’t let the beer scare you away. It is even safe for kids of all ages. As the beer bread is baking the beer in the ingredients does and will bake out of the bread living it totally kid and adult alcohol free.

Recipe Ingredients:

You would say this recipe is pretty easy! All the ingredients are staple pantry items plus only 6 ingredients. It is crazy to think that these ingredients are going to make such a soft and moist bread recipe. Within a few minutes this homemade bread recipe will be ready to bake and smell all throughout your home. Enjoy a warm slice of bread soon enough!

  • Flour: This helps thicken and stick all the ingredients together.
  • Baking Powder: Has a special power by creating a yeast with the beer can.
  • Salt: Fine sea salt works really well.
  • Brown Sugar: Sweeten the bread a bit with some brown sugar.
  • White Sugar: Adds that sweet and sugary taste to the beer bread.
  • Beer Can: Go with your favorite or try something new. The main reason for the beer is not for flavoring but for creating a years with the baking powder.
  • Butter: The butter helps give it that soft butter taste and look on the inside as well as a thick and crispy crust on the outside.

How to Make Beer Bread:

No need to worry about the beer. The alcohol will bake right out of the bread. Its purpose is focused on creating a simple combination of yeast to help make this homemade bread. The new way of making bread at home!

  1. Mix ingredients together: Preheat oven to 375 degrees.  In a large bowl sift together the flour, baking powder, and salt.  Add the brown sugar and white sugar.  Add the beer and mix together until it forms a dough.
  2. Spread the dough in a pan: In a 9×5 inch greased loaf pan spread the dough evenly.  Pour melted butter on top.  Bake for 50-55 minutes or until golden brown and toothpick inserted in center comes clean.

The Recipe Critic Pro Tip:

It is best to use a darker beer for the flavoring but a lighter beer will also work. 

The process of making butter beer bread by combining all ingredients together then letting it sit then adding it to a loaf pan with parchment paper underneath.

Beer Bread Variations:

Let’s customize your bread! These variations are always fun suggestions on how to create more than just one recipe.

  • Honey: A touch of honey creates a sweeter bread that is comforting and will melt in your mouth, it is that good!
  • Herbs and seasonings: Mix in your favorite fresh or dried herbs to have more flavors. Rosemary or thyme are some of my favorites!
  • Garlic: Garlic seems to be in everything and loved by most. Add in a clove or two to the batter and smell it while it is baking!
  • Cheese: Sprinkle shredded cheese in the batter or over top and make a cheesy beer bread.
  • Spicy: I do love a little heat. Add in jalapeños or green chilies for some spicy bread variations.

Tips For the Best Beer Bread:

These tips are helpful and can make this beer bread even better!

  • Beer: I do not drink beer so I am not an expert but I have found as I am cooking and baking that a darker beer is best. It adds more flavor. I have tried a few different beers in my bread recipe and so far the darker seems to have the most flavor. Not to worry though, it is a buttery, moist and delicious flavor that doesn’t taste like beer at all.
  • Substitute: If you are worried about too much sugar, substitute the sugar with the same amount of honey.
  • Slicing the bread: It is best to use a serrated sharp knife when slicing the bread. This will give it a clean and crisp cut every time.

Serving Ideas:

Serve this buttery beer bread with your favorite topping or as a side dish! Just beware, this bread is the best and won’t last long!

  • Spread honey and butter over top
  • Butter and jam is always a classic
  • Add it as a side dish to soup like chili, vegetable or a thick bean soup.
  • Have a side dish to your favorite stew or slow cooker meal.

Beer bread sliced a piece off to see the thick and soft inside of the bread.

Best Way to Store:

It is best to store this bread at room temperature in a sealed bag. It will stay fresh for about 3 to 5 days long. This beer bread recipe does not need to be stored in the refrigerator. It will actually dry out the bread as well as go stale more quickly.

More Delicious Bread Recipes:

Buttery beer bread sliced up on a cutting board.

Print

Buttery Beer Bread

No yeast, No problem!  This recipe is a light and fluffy buttery bread that is filled with a special ingredient that substitutes for yeast. You guessed it, beer! With this six ingredient recipe you will be sure to please your family with this homemade bread recipe! 
Course Bread
Cuisine American
Keyword beer bread, beer bread recipe, butter bread, buttery beer bread, buttery beer bread reipe
Prep Time 15 minutes
Cook Time 1 hour
Total Time 1 hour 15 minutes
Servings 12 slices
Calories 229kcal
Author Alyssa Rivers

Ingredients

  • 3 cups flour
  • 3 teaspoons baking powder
  • 1 teaspoon salt
  • 1/4 cup brown sugar
  • 1/4 cup white sugar
  • 1 12 ounce can beer
  • 1/2 cup butter melted

Instructions

  • Preheat oven to 375 degrees. In a large bowl sift together the flour, baking powder, and salt. Add the brown sugar and white sugar. Add the beer and mix together until it forms a dough.
  • In a 9x5 inch greased loaf pan spread the dough evenly. Pour melted butter on top. Bake for 50-55 minutes or until golden brown and toothpick inserted in center comes clean.

Notes

The alcohol in beer bread evaporated as it bakes. 

Nutrition

Serving: 1slice | Calories: 229kcal | Carbohydrates: 34g | Protein: 3g | Fat: 8g | Saturated Fat: 5g | Cholesterol: 20mg | Sodium: 265mg | Potassium: 149mg | Fiber: 1g | Sugar: 9g | Vitamin A: 236IU | Calcium: 55mg | Iron: 2mg

Warm buttery bread sliced up with a slice of butter on top that is slowly melting. .


source https://therecipecritic.com/beer-bread-recipe/
Share:

Baked French Toast

Baked French Toast is full of cinnamon sugar goodness and baked in an easy custard that leaves the sweet brioche bread soft on the inside and crisp on the outside. Breakfast heaven!

French toast is a breakfast classic! Don’t miss this Secret Ingredient French Toast, this Blueberry Cream Cheese Stuffed French Toast, and this Almond Crusted French Toast.

French toast in a white pan baked and syrup is drizzled over.

Baked French Toast

Baked French Toast is one of my favorite brunch items to make on the weekend for many reasons. First, it’s insanely easy to throw together. Second, it can be make ahead of time. And lastly, EVERYONE loves it.

Our version of baked French toast takes layers of rich brioche bread that’s saturated in a super simple cinnamon sugar custard. Right before baking the bread and custard get dusted with more cinnamon and sugar and baked until the inside is soft and rich, and the outside is irresistibly crispy and brown.

Most people serve their French toast with maple syrup AFTER they serve it up, but I like to pour the maple syrup all over the baked French toast immediately after it gets out of the oven so it soaks into the hot bread and custard before it hits anyone’s plate. It’s HEAVEN.

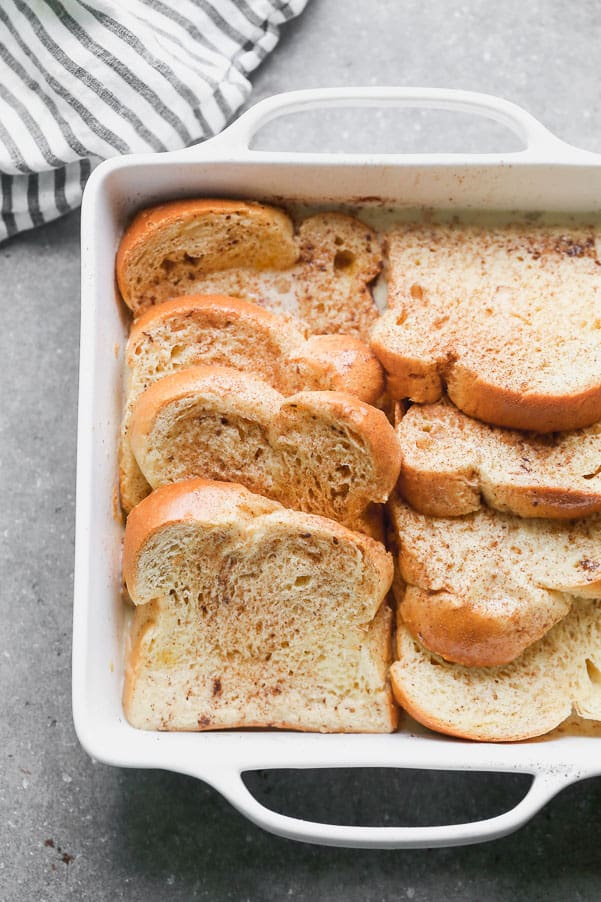
Thick toast layered together in a white baking pan.

Ingredients in French Toast:

  • Brioche bread. This is my favorite kind of bread to use for French Toast. It’s dense and made with eggs and butter so it’s rich, delicious, and perfect for French toast. Because it is sightly soft right out of the package, it’s really important for it to be a day-old and slightly stale so it doesn’t get soggy when the bread soaks.
  • I like to leave the bread out on a sheet pan overnight, but if you don’t have time for that, you can also put the bread pieces on a sheet pan and  bake at 275 degrees for 20-45 minutes until it resembles stale bread.
  • Eggs. Eggs add richness to our Baked French Toast, and you’ll need about four large ones.
  • Milk. You could use any kind of milk you want, from skim milk to heavy creamy, but the higher the fat content, the richer the baked French toast will be. I like to use a sort of middle-of-the-ground choice which is whole milk. It’s not as rich and fattening as heavy cream, but still results in a rich custard.
  • Sugar. Sugar isn’t exactly traditional in classic French toast, but I like to add just a little bit to the custard to sweetened it up. We also sprinkle on a little extra sugar on top right before baking to help crisp up the top of the baked French toast as well.
  • Cinnamon. For me, French toast isn’t complete without a little bit of ground cinnamon. In this recipe, we use it both in the custard and also sprinkle it on top just before baking along with the sugar.
  • Vanilla. The last pertinent ingredient in French toast. Use 100% pure vanilla extract and no the imitation brand.

How to Make Baked French Toast:

  1. Dry out the bread. If you can remember, or have time, leave the bread out overnight on a sheet pan to dry out. If you forget, no big deal, just place the bread on a large sheet pan and place in a 250-degree oven for 25-35 minutes until the texture resembled stale bread.
  2. Make the custard. Whisk the eggs, milk, sugar, vanilla, cinnamon, and pinch of salt together in a medium bowl.
  3. Layer the bread. Layer the bread in a 9×9 greased baking dish. They should overlap a little bit. Pour the custard on top. Lift up the pieces of bread to make sure each piece gets saturate in the custard. Sprinkle more cinnamon and sugar on top.
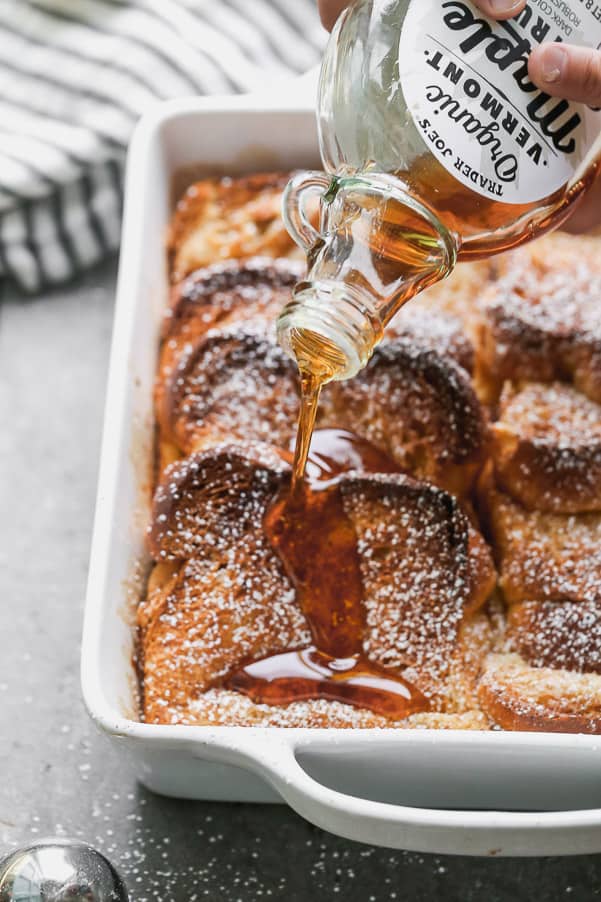
  4. Bake. Bake in a 375-degree oven for about 25-30 minutes until the baked French toast is puffed and brown. Immediately pour maple syrup on top. Cut into pieces and serve with extra maple syrup and softened, salted butter.

Egg wash with milk and vanilla in a white bowl next to the layers of toast in a white baking pan.

Can I make these in Advance?

Yes! We recommend making it three hours in advance anyways, but if you need to make it in advance even more than that, go ahead.

On the opposite end, do I have to make these in advance?

While it’s best to make Baked French Toast at least an hour in advance, a workaround would be to individually soak the stale pieces of bread in the custard for a few minutes until the bread is completely saturated, then layer it into the baking dish. Pour any extra custard on top and bake as instructed.

French toast baked in a white baking pan with maple syrup being poured out of a glass bottle over top of the French toast.

Substitutions and Tips and Tricks for Recipe Success:

  • Be sure the bread is stale. If the bread is fresh, you risk the baked French toast becoming super soggy.
  • If you can’t find brioche, you can also use challah, Italian bread, ciabatta, or French bread.
  • For extra crunch, sprinkle the baked French toast with chopped walnuts or pecans.
  • Make sure your bread slices are at least 1 1/2 inches thick.
  • Add in one teaspoon of almond extract for a nice flavor in addition to the vanilla.

What to serve with Baked French Toast:

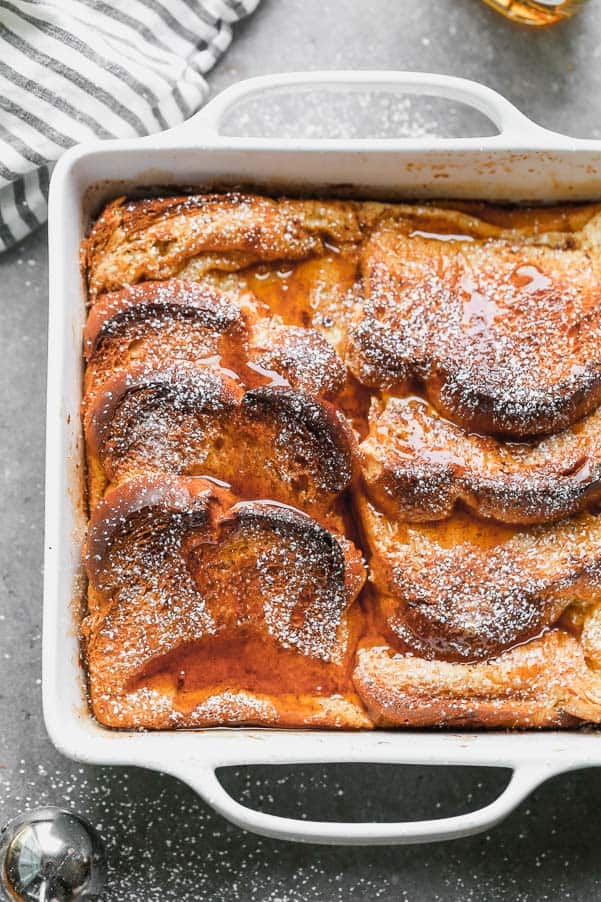
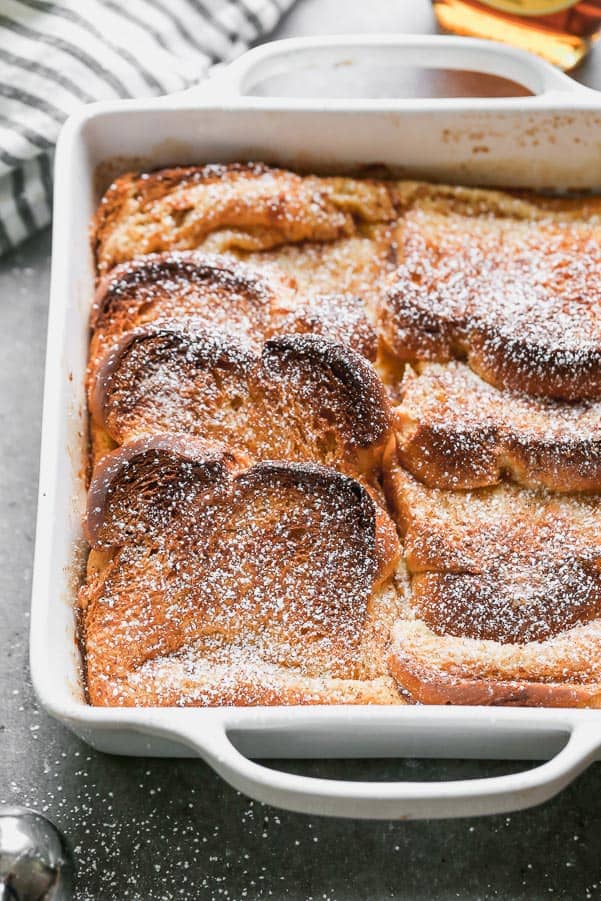
Baked French toast in a white baking pan with powdered sugar over top.

Enjoy these French Toast Recipes Too!

Print

Baked French Toast

Baked French Toast is full of cinnamon sugar goodness and baked in an easy custard that leaves the sweet brioche bread soft on the inside and crisp on the outside. Breakfast heaven!
Course Breakfast
Cuisine American
Keyword baked french toast, easy french toast, custard french toast, french toast
Prep Time 5 minutes
Cook Time 25 minutes
Resting time 3 hours
Total Time 3 hours 30 minutes
Servings 4 people
Calories 605kcal
Author Nicole Leggio
Cost $12

Equipment

  • Mixing Bowl
  • Baking dish

Ingredients

  • 8 slices day old thick-sliced brioche bread (ciabatta, challah or italian bread will work as well) I use Trader Joe's
  • 1 tbsp butter, softened
  • 4 large eggs
  • 1 3/4 cup whole milk
  • 2 tsp vanilla extract
  • 1/2 tsp cinnamon, plus more for dusting
  • 2 tbsp + 2 tsp sugar
  • 1/4 tsp kosher salt
  • 1/2 cup maple syrup

Instructions

  • Make sure your bread is stale and at least one day old. If it's not, let it sit in a 250 degree oven for about 30 minutes until it's stale.
  • Preheat oven to 375 degrees. Coat a 9x9 baking dish with the softened butter. Layer the bread in two rows. Each piece of bread should halfway cover the next.
  • Add eggs, milk, vanilla, 1/2 teaspoon cinnamon, 2 tablespoons sugar, and salt to a medium bowl. Whisk to combine. Pour the mixture over the bread slowly, lifting the layers of bread up so each pieces is coated in the custard. Cover with plastic wrap and let it sit in the fridge for 2-3 hours.
  • When you're ready to bake, sprinkle with the remaining two teaspoons of sugar and dust with a little bit of cinnamon. Bake in the oven until puffed and the tops of the bread slices are crisp and brown. Pull out from the oven and drizzle with maple syrup. Cut into 4-6 pieces and serve with butter and more maple syrup if desired.

Nutrition

Serving: 1serving | Calories: 605kcal | Carbohydrates: 72g | Protein: 18g | Fat: 22g | Saturated Fat: 14g | Cholesterol: 324mg | Sodium: 611mg | Potassium: 300mg | Sugar: 37g | Vitamin A: 1130IU | Calcium: 232mg | Iron: 2mg


source https://therecipecritic.com/baked-french-toast/
Share:

Popular

Archive

Slider Tag

Facebook

Header Ads

Recent in Food

Blog Archive

Recent Posts

Unordered List

  • Lorem ipsum dolor sit amet, consectetuer adipiscing elit.
  • Aliquam tincidunt mauris eu risus.
  • Vestibulum auctor dapibus neque.

Pages

Theme Support

Need our help to upload or customize this blogger template? Contact me with details about the theme customization you need.